Configure Microsoft FSLogix Profile Containers with OCI Secure Desktops Using ZFS SMB
Configure Microsoft FSLogix Profile Containers for OCI Secure Desktops using an Oracle ZFS Storage Appliance SMB share.
This document describes how to use an Oracle ZFS Storage Appliance (ZFSSA) SMB share on OCI to host Microsoft FSLogix Profile Containers, and how to use that share with an OCI Secure Desktops / Windows 11 Golden Image.
The document is based on an actual configuration workflow. Replace the sample IP addresses, domain names, and share names with values from your own environment.
| Item | Example Value | Description |
|---|---|---|
| AD / DNS / DC | 10.100.0.163 | Active Directory domain controller, also used as AD DNS |
| AD DNS Domain | js.l | AD domain name used when joining the domain |
| ZFSSA Data IP | 192.168.0.45 | zfs-data-a VNIC IP, used for SMB / FSLogix data access |
| ZFSSA Admin IP | Public management IP, for example | zfs-adm-a VNIC IP, used for BUI / SSH management, not for FSLogix |
| SMB Share | primary | ZFSSA filesystem / SMB share name |
| FSLogix Profile Path | \\192.168.0.45\primary\profiles | The path used by the FSLogix configuration |
| Test AD Users | js\luka, js\dennis | AD test users used in this validation |
Important: the FSLogix path must use the ZFSSA data VNIC IP. Do not use the AD IP address, and do not use the ZFSSA public management IP.
- ZFS (Zettabyte File System) provides the backend storage layer,
- SMB (Server Message Block) provides Windows file share access,
- Microsoft FSLogix Profile Containers store Windows user profiles as VHDX files on that SMB share.
Architecture Overview
The overall architecture is shown below:
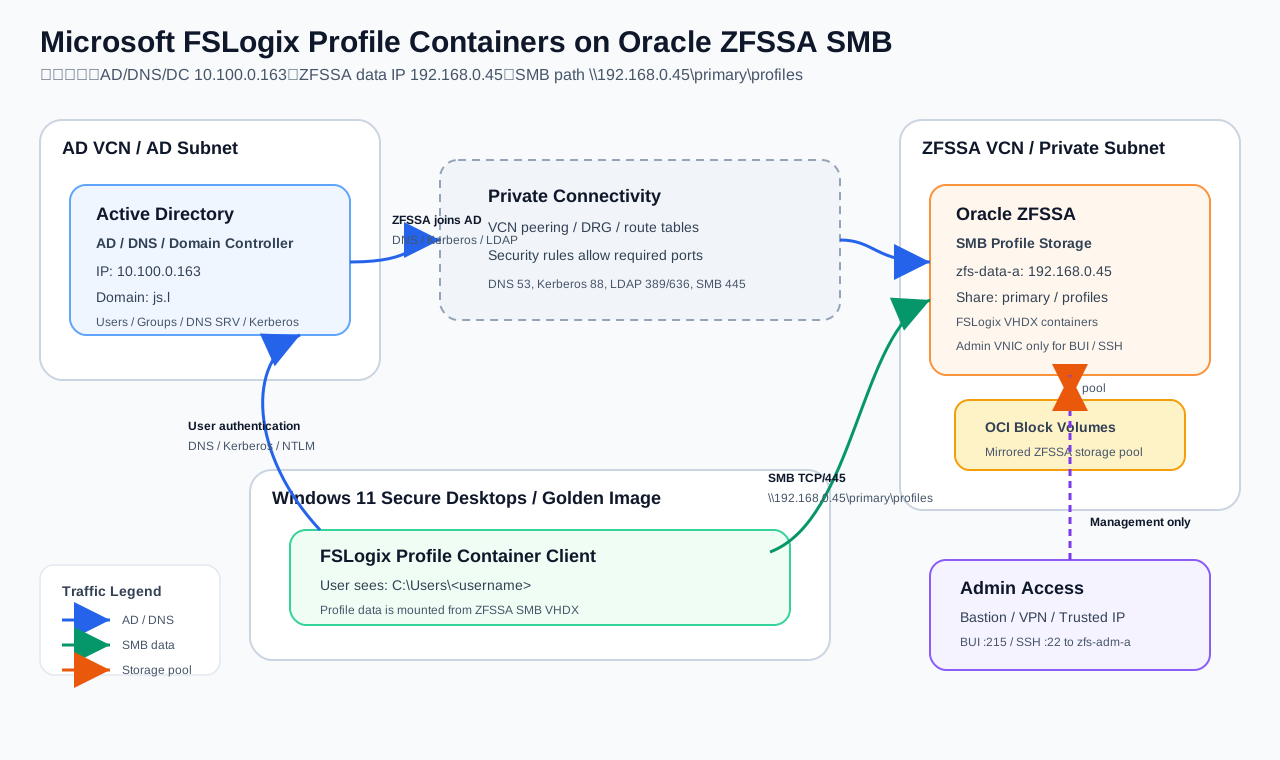
Key traffic flows:
- Windows 11 / Secure Desktop accesses AD / DNS / DC
10.100.0.163for user authentication, DNS queries, and domain services. - Windows 11 / Secure Desktop accesses the ZFSSA data IP
192.168.0.45over SMBTCP/445to mount the FSLogix profile container. - ZFSSA itself must access AD / DNS / DC for DNS SRV lookup, Kerberos / LDAP, and domain join operations.
- The ZFSSA admin IP is only for BUI / SSH management. It should not be used as the FSLogix SMB data path.
AD / DNS / DC
10.100.0.163
Responsible for: users, groups, authentication, DNS SRV records, Kerberos / NTLM

ZFSSA
zfs-data-a: 192.168.0.45
Responsible for: SMB share, profiles directory, FSLogix VHDX files

Windows 11 Golden Image / Secure Desktop
Responsible for: installing FSLogix, reading policy, mounting the profile container at logon
After a user logs in to Windows 11, the visible profile path is still:
C:\Users\<username>
However, the real profile data is stored in:
\\192.168.0.45\primary\profiles\<user-folder>\Profile_<username>.vhdx
Active Directory does not store these directories or VHDX files. AD is only responsible for authentication and authorization.
Task 1 — Create ZFSSA Instance from OCI Marketplace
Launch the ZFS Storage Appliance / ZFSSA Storage Deployment Resource Manager stack from OCI Marketplace.
This test uses the SingleHead single-node model, which means a non-HA deployment. The following images show sample Resource Manager Stack variables to configure; replace the compartment, VCN, subnet, AD, and SSH key values with your own environment values.
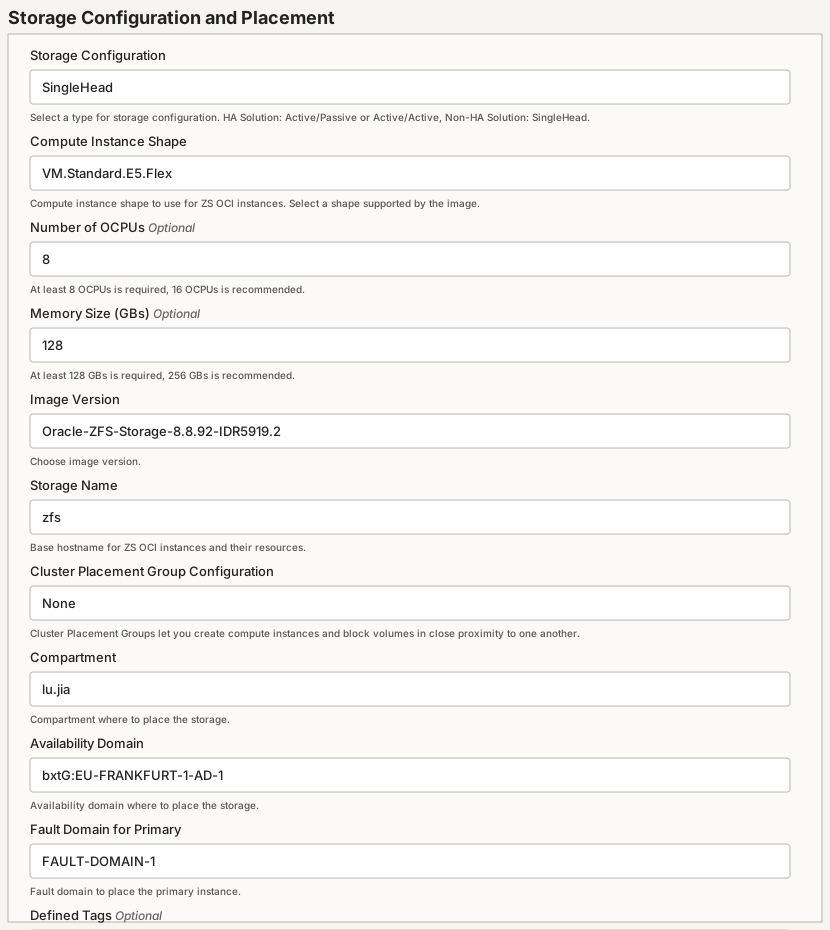
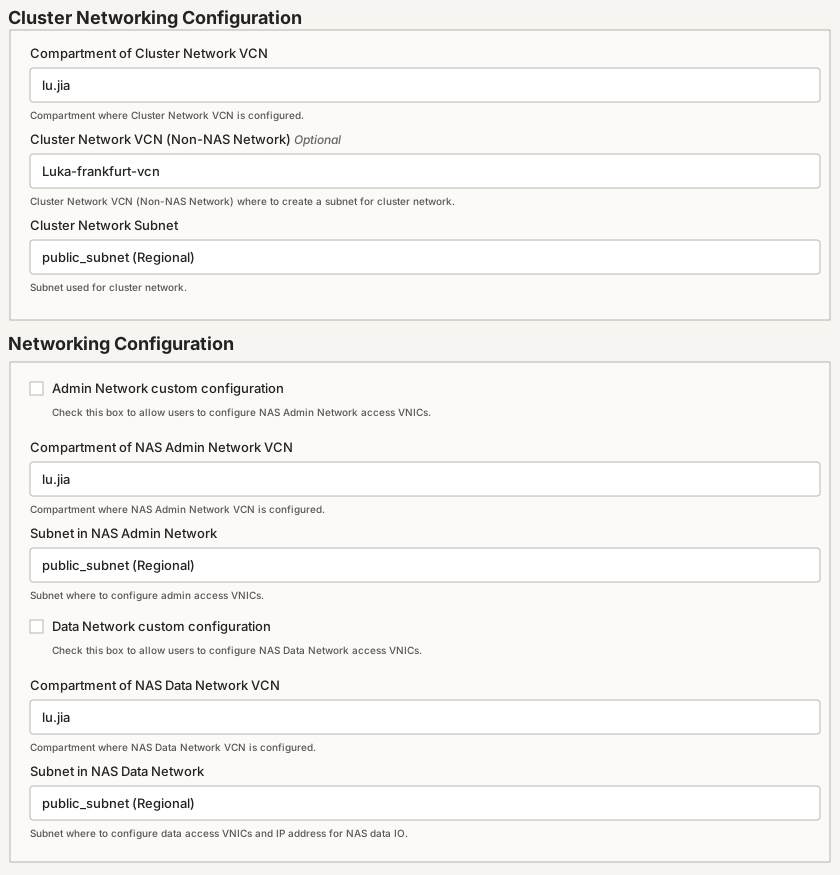
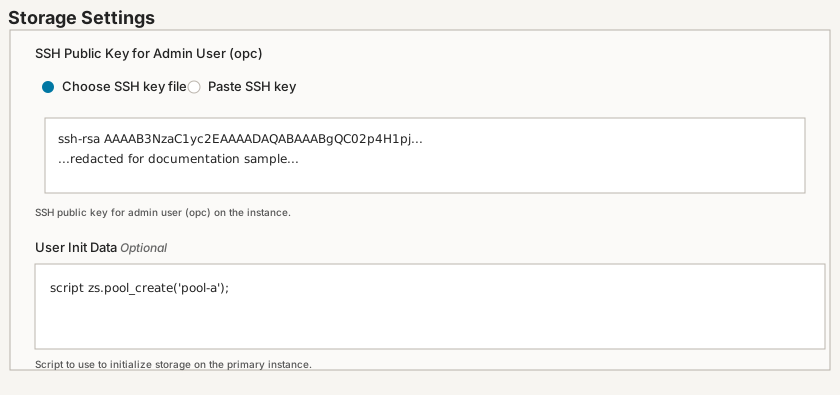
A basic PoC deployment can be understood as:
1 ZFSSA VM / appliance instance
+
2 OCI Block Volumes used to create a mirrored storage pool
Notes:
- The boot volume is the system disk and is not counted as one of the two data disks.
- The two block volumes are later used in the ZFSSA BUI to create the storage pool.
- For production, HA can be considered, but HA introduces primary / secondary heads and is no longer the same as a simple single-node model.
Network Recommendation
For production, place ZFSSA in a private subnet and access the management interface through Bastion, VPN, FastConnect, or a Windows management host.
For a PoC, a public subnet can be used, but restrict security rules:
- Allow management ports such as BUI / SSH only from trusted public IP addresses.
- Do not expose SMB
TCP/445to the public Internet. - FSLogix / SMB clients should access the private IP of
zfs-data-a.
Common ZFSSA VNIC usage:
| VNIC | Usage |
|---|---|
zfs-0-a | Primary VNIC, underlying/system use; not recommended as the SMB path |
zfs-adm-a | Admin access for BUI / SSH management |
zfs-data-a | Data access for SMB / NFS / NAS traffic |
zfs-ax-a | Auxiliary or HA-related usage |
The FSLogix path should use:
\\<zfs-data-a-private-ip>\<share-name>\profiles
Example:
\\192.168.0.45\primary\profiles
Task 2 — Configure ZFSSA
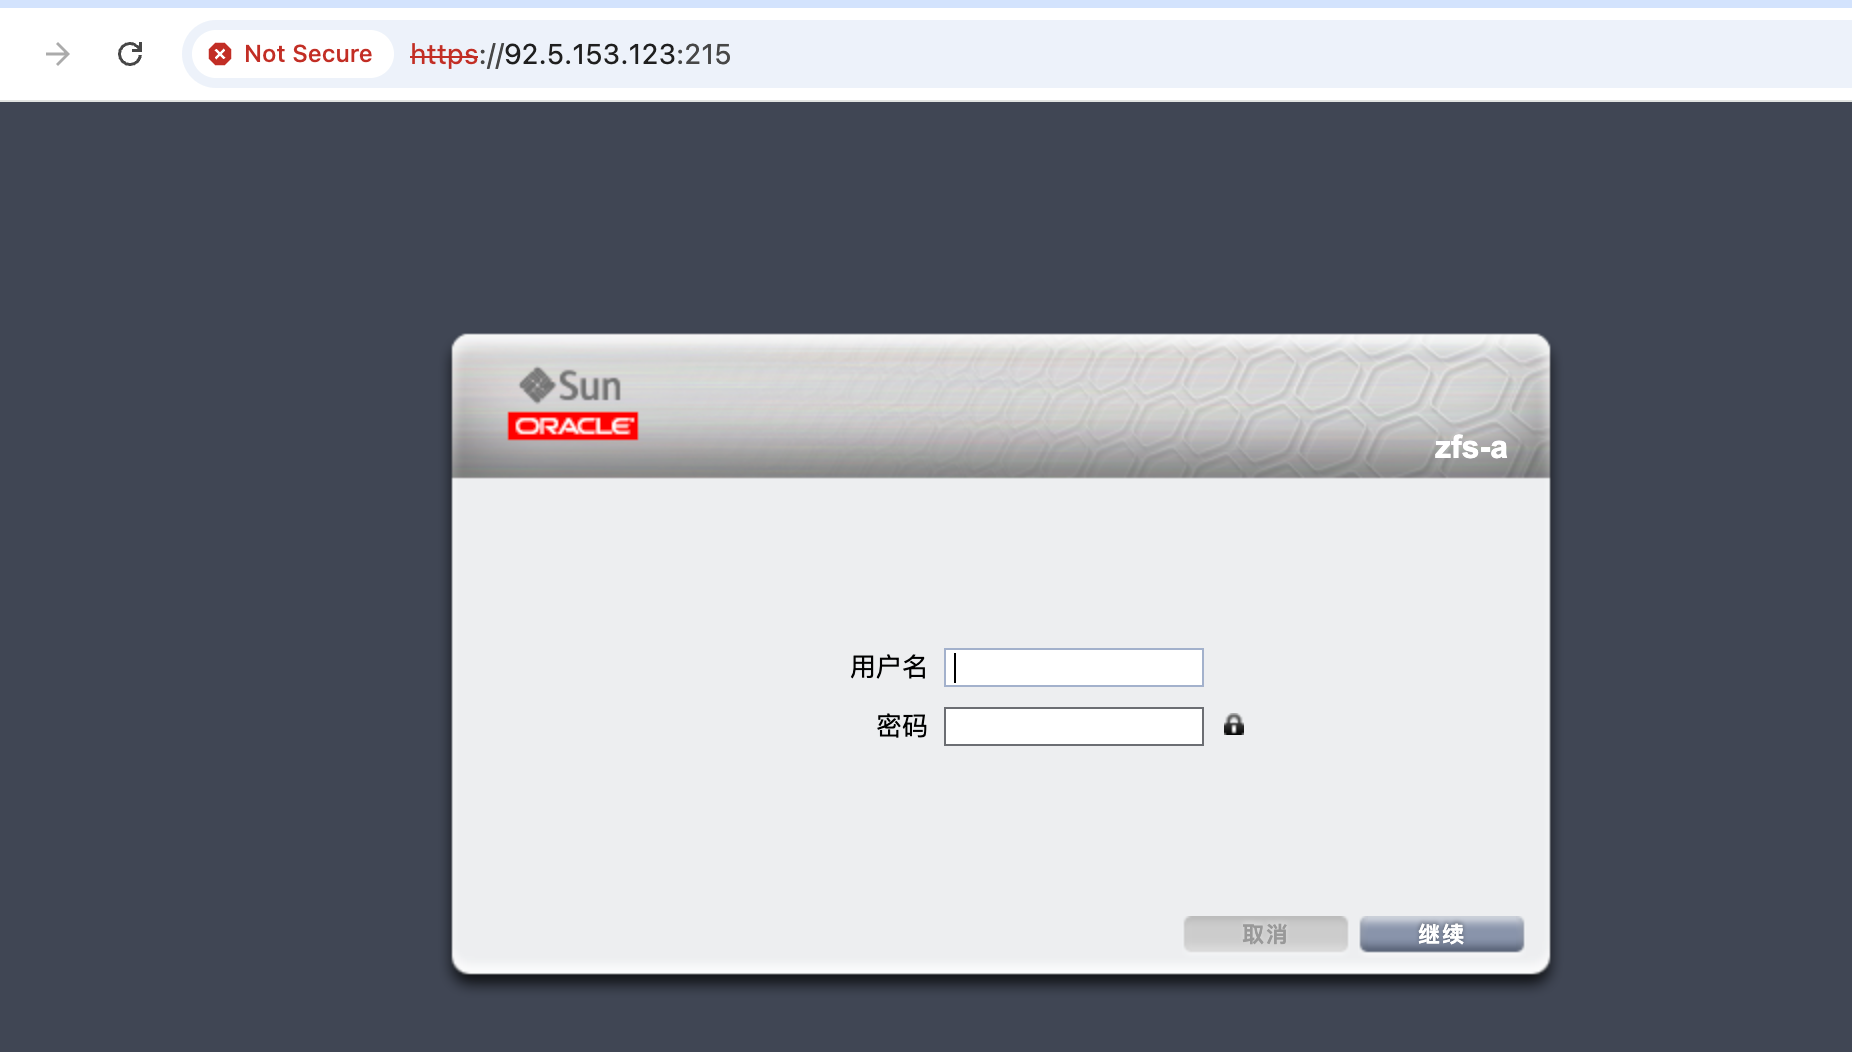
2.1 Login to ZFSSA BUI
After deployment, first SSH to the ZFSSA appliance with your private key, for example:
ssh -i <private-key> opc@<zfs-adm-a-ip-or-fqdn>
Then set the BUI login password for opc in the ZFSSA CLI:
configuration users
select opc
set initial_password
commit
Open the BUI:
https://<zfs-adm-a-ip-or-fqdn>:215/
Log in with opc and the password you just set.
2.2 Configure DNS
Go to:
Configuration > Services > DNS
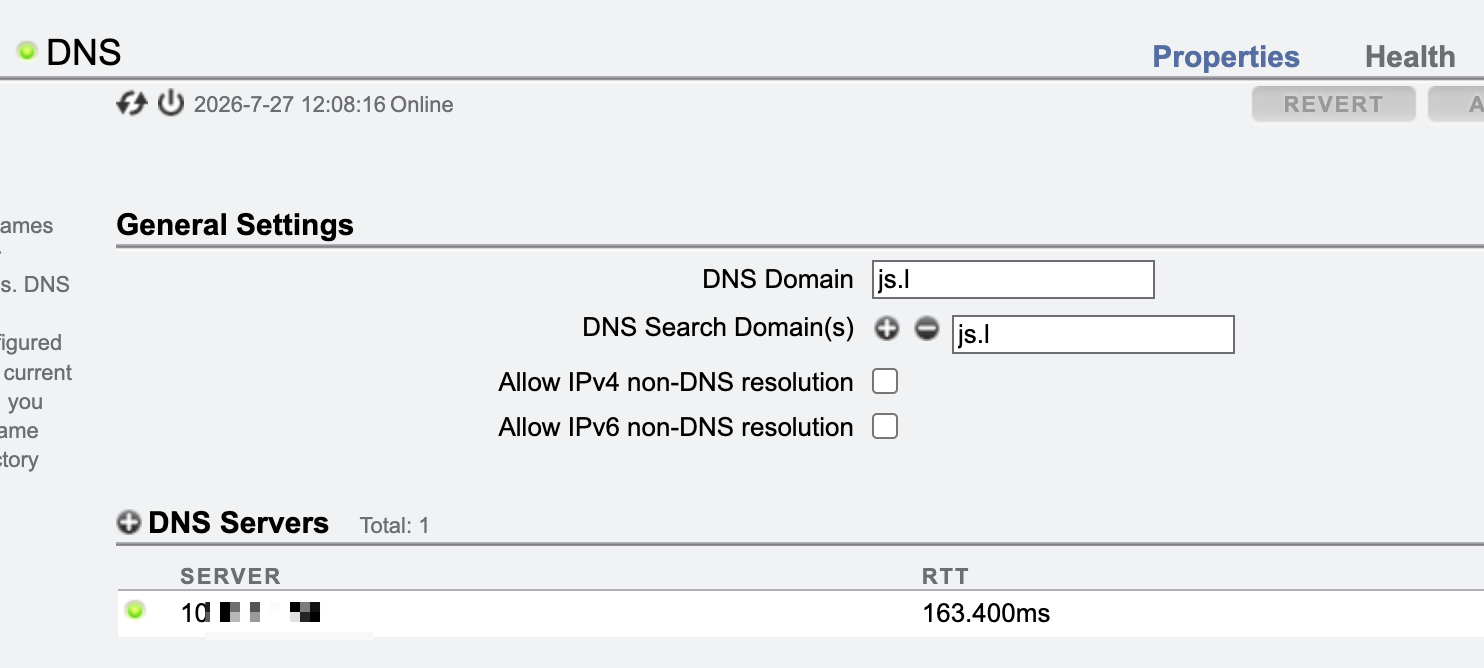
DNS must point to AD DNS, not the default OCI DNS.
Example:
DNS Domain: js.l
DNS Search Domain(s): js.l
DNS Servers: 10.100.0.163
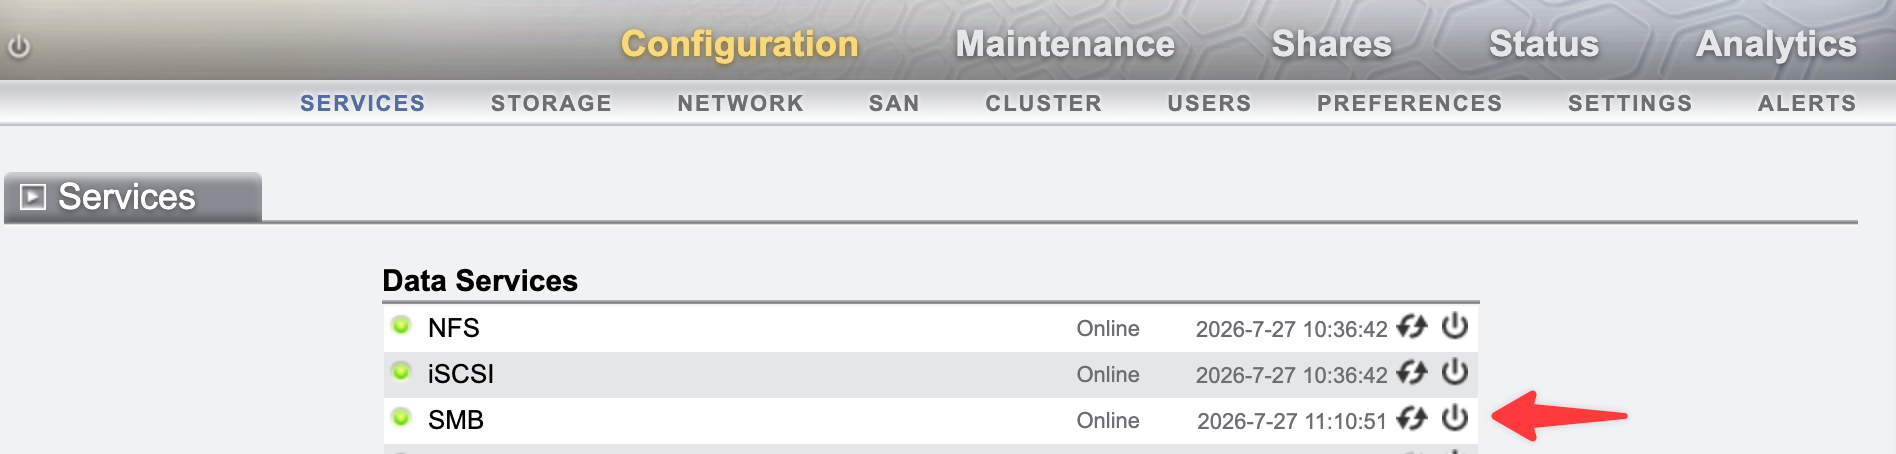
If ZFSSA still uses 169.254.169.254, it usually cannot query the AD SRV records, and the domain join may fail with:
The appliance could not find the appropriate SRV record ...
You can verify SRV records on the AD server:
nslookup -type=SRV _ldap._tcp.dc._msdcs.js.l 10.100.0.163
nslookup -type=SRV _kerberos._tcp.js.l 10.100.0.163
nslookup adfs.js.l 10.100.0.163
2.3 Configure NTP
Kerberos is time-sensitive. Keep the time difference between ZFSSA and the DC below 5 minutes.
Go to:
Configuration > Services > NTP
Use the AD / DC or the same time source used by the DC:
NTP Server: 10.100.0.163
2.4 Join Active Directory Domain
Go to:
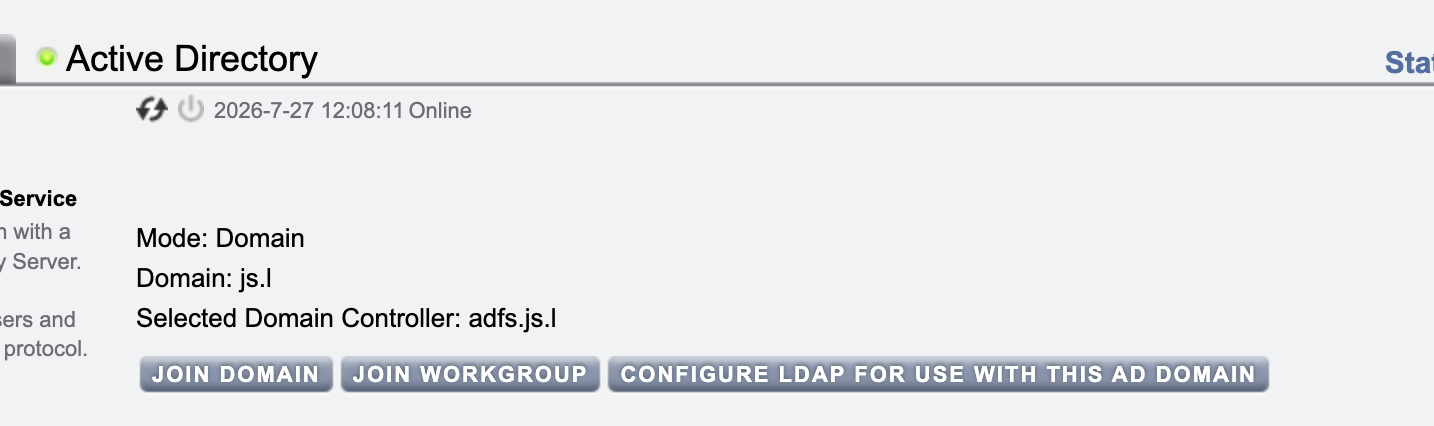
Configuration > Services > Active Directory
Click JOIN DOMAIN and enter the AD domain information.
Prefer a short username or NetBIOS format first, for example:
Domain: js.l
User: Administrator
Password: <AD Administrator password>
Or:
Domain: js.l
User: JS\Administrator
Password: <AD Administrator password>
Replace JS with your real NetBIOS domain name. You can query it on the DC:
(Get-ADDomain).NetBIOSName
Do not use a local ZFSSA user, for example:
opc
js\opc
opc is a local ZFSSA management account, not an AD domain account.
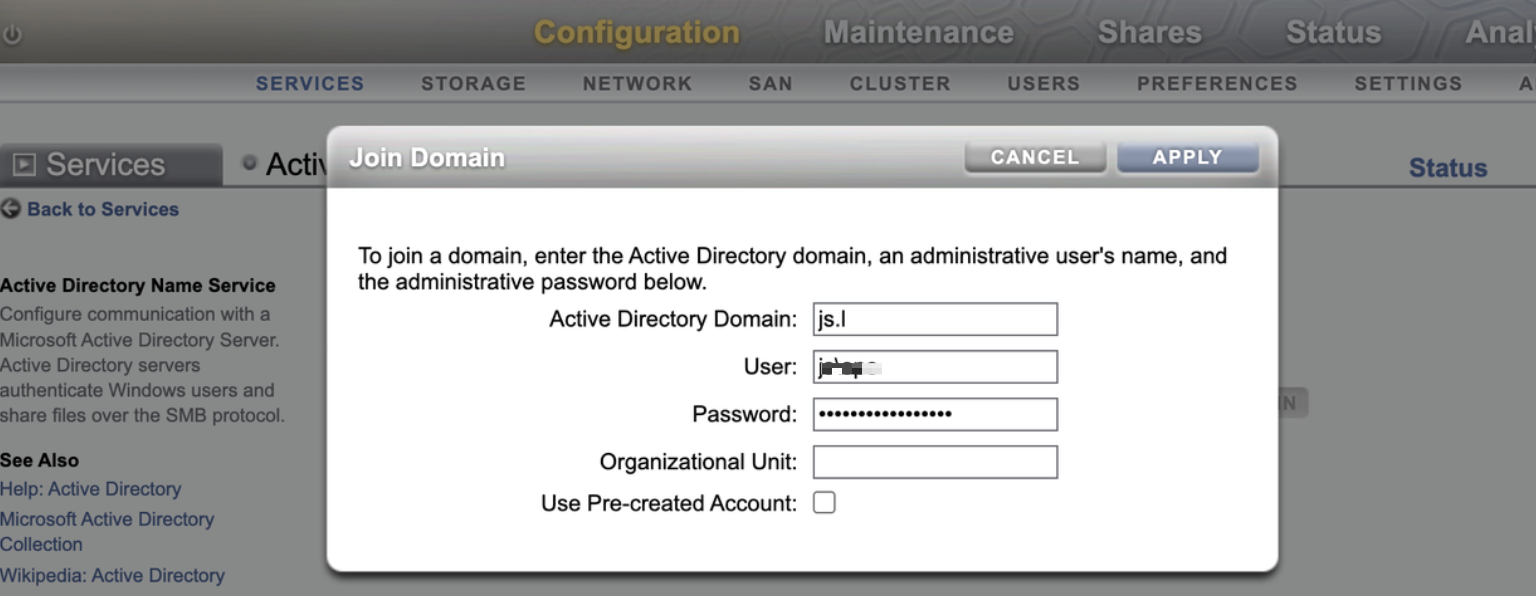
If domain join fails, check DC Security Event 4625:
SubStatus 0xc0000064: the user does not exist; this is usually a username format issue.SubStatus 0xc000006A: incorrect password.- If
IpAddressis the ZFSSA IP, the network and DNS path already works; the issue is authentication or account format.
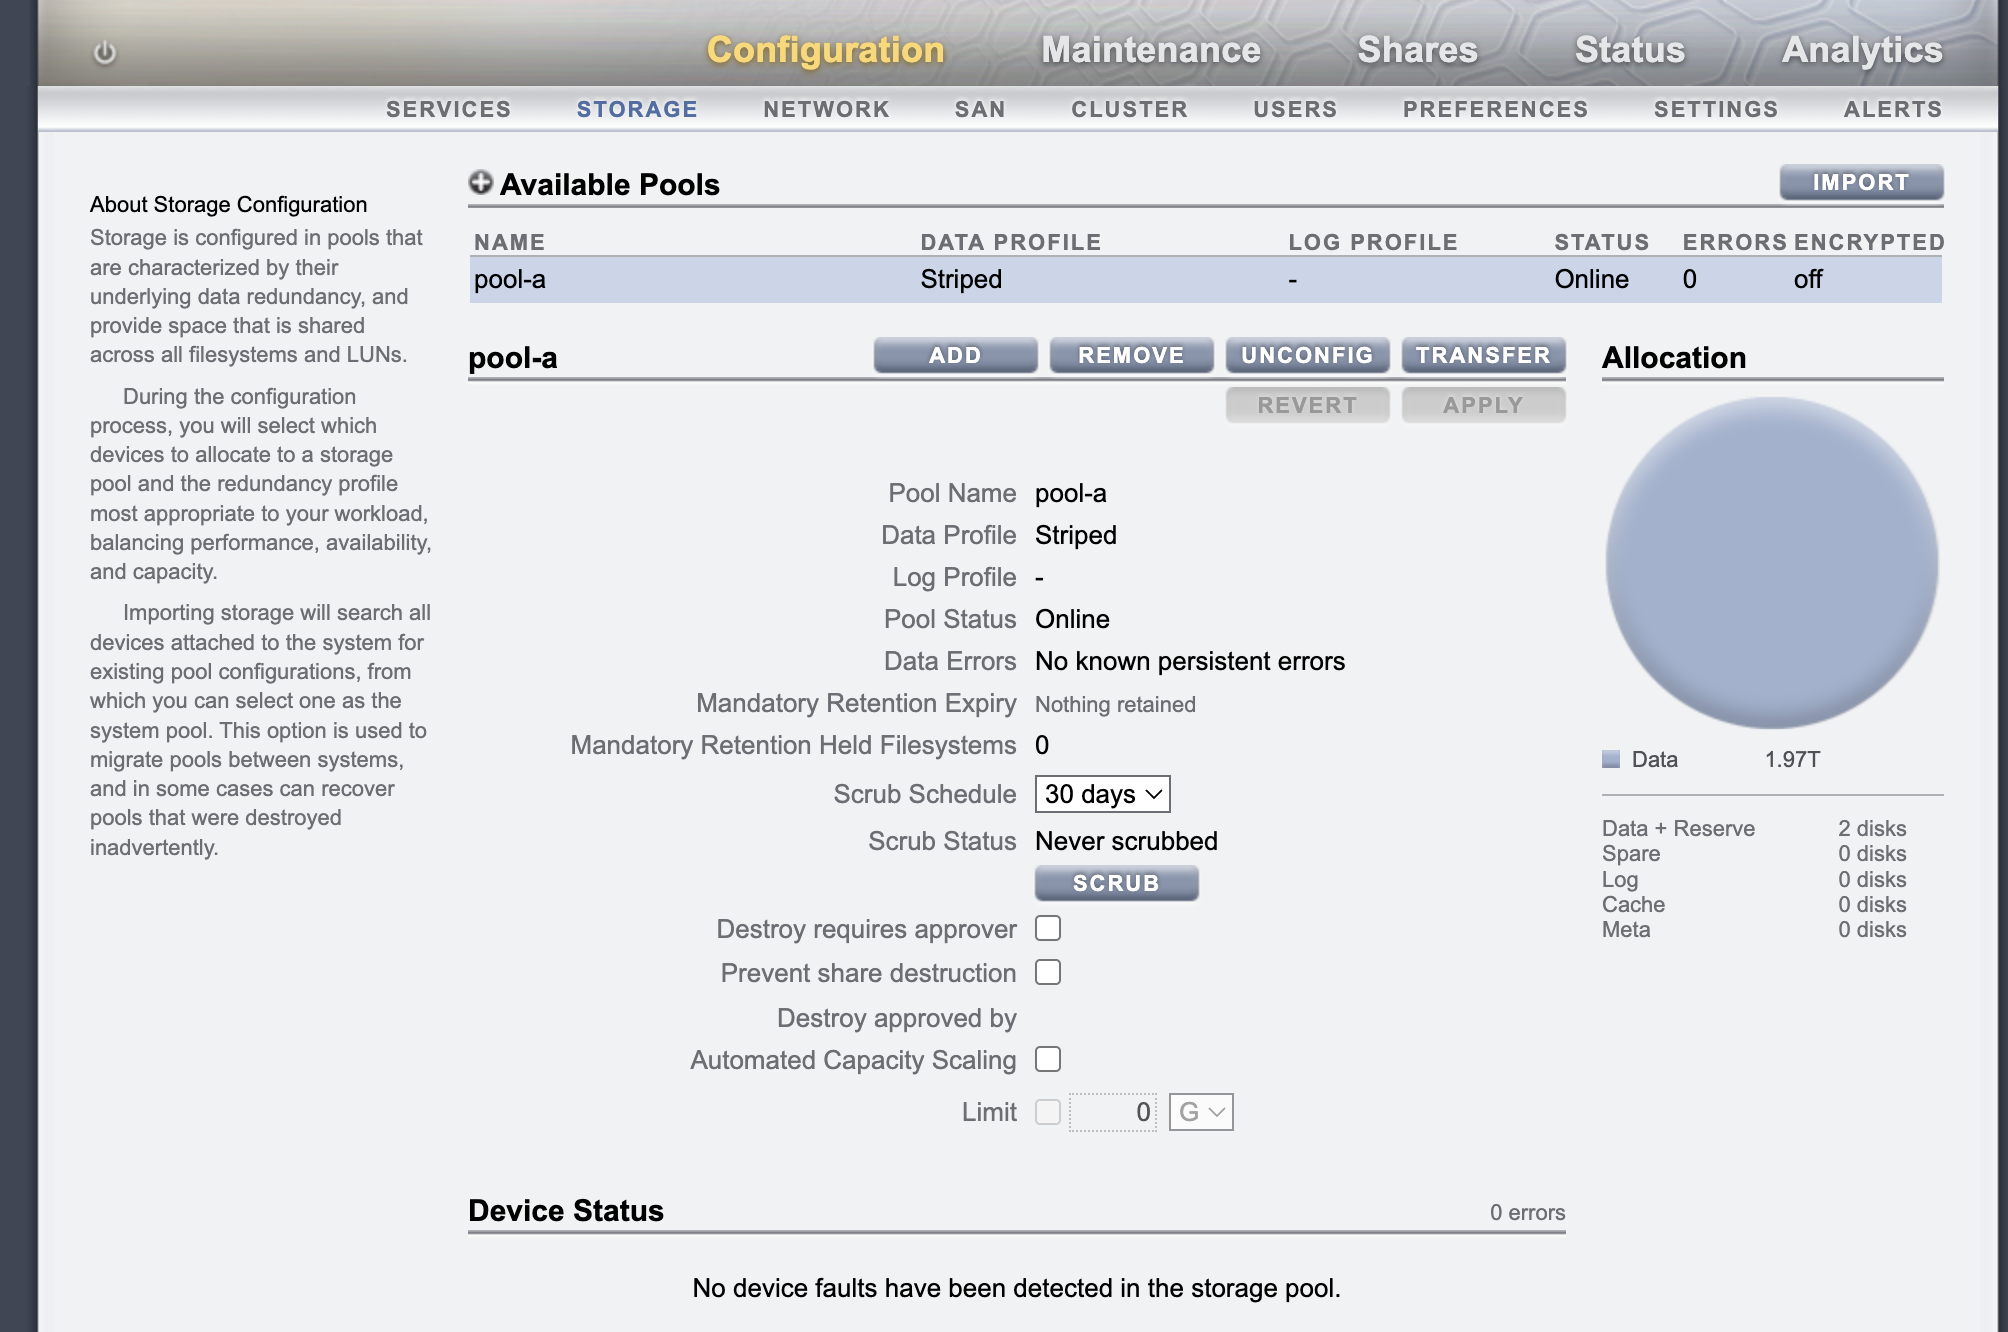
2.5 Verify Storage Pool
Go to:
Configuration > Storage
Confirm that the block volumes have been used to create the ZFSSA storage pool.
2.6 Create Project and SMB Filesystem
Go to:
Shares > Projects
Create a project, then create a filesystem / share. In this example, the filesystem / share name is:
primary
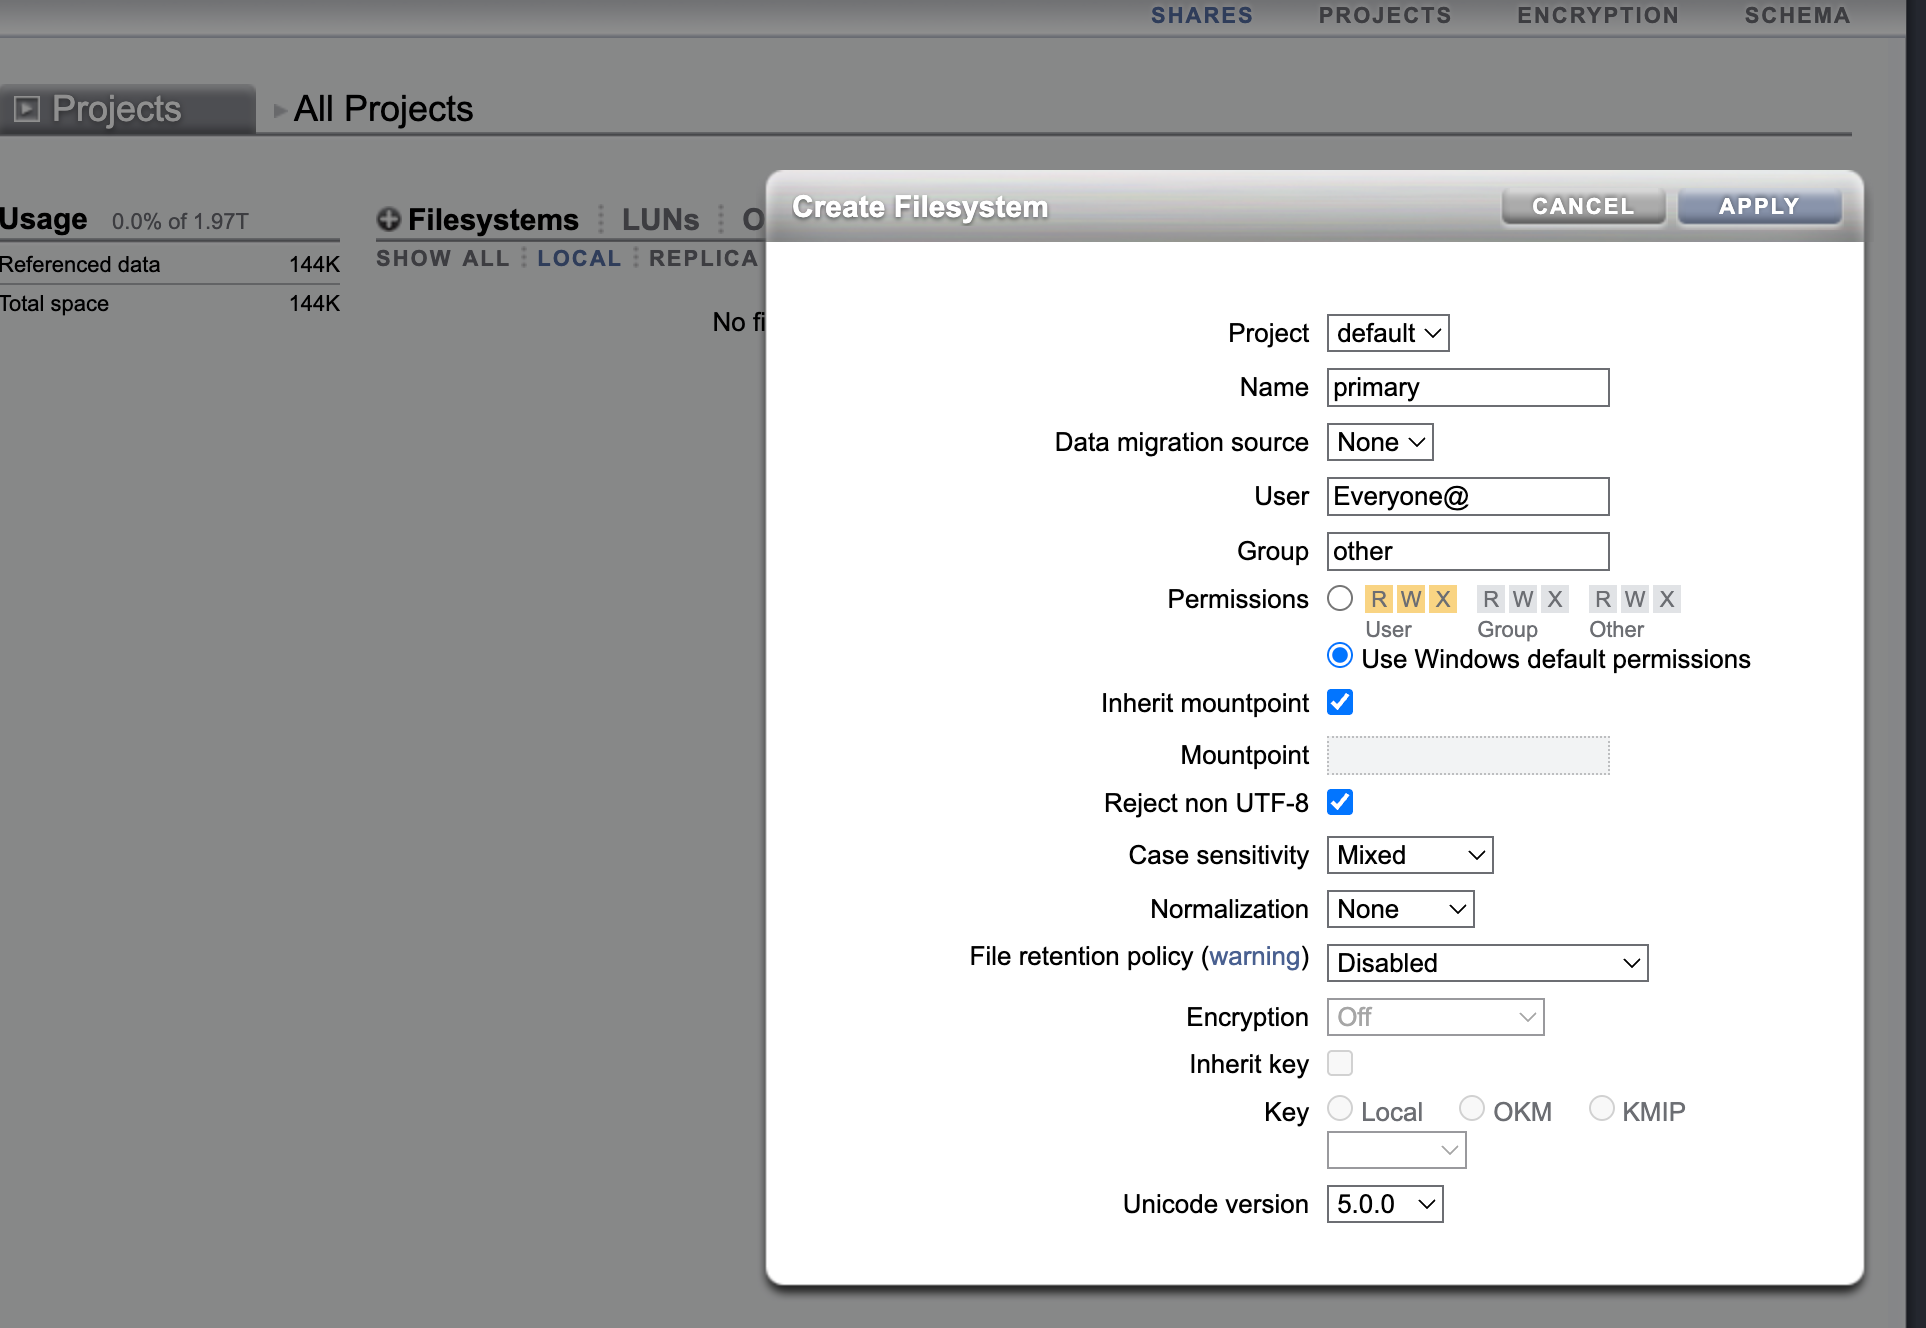
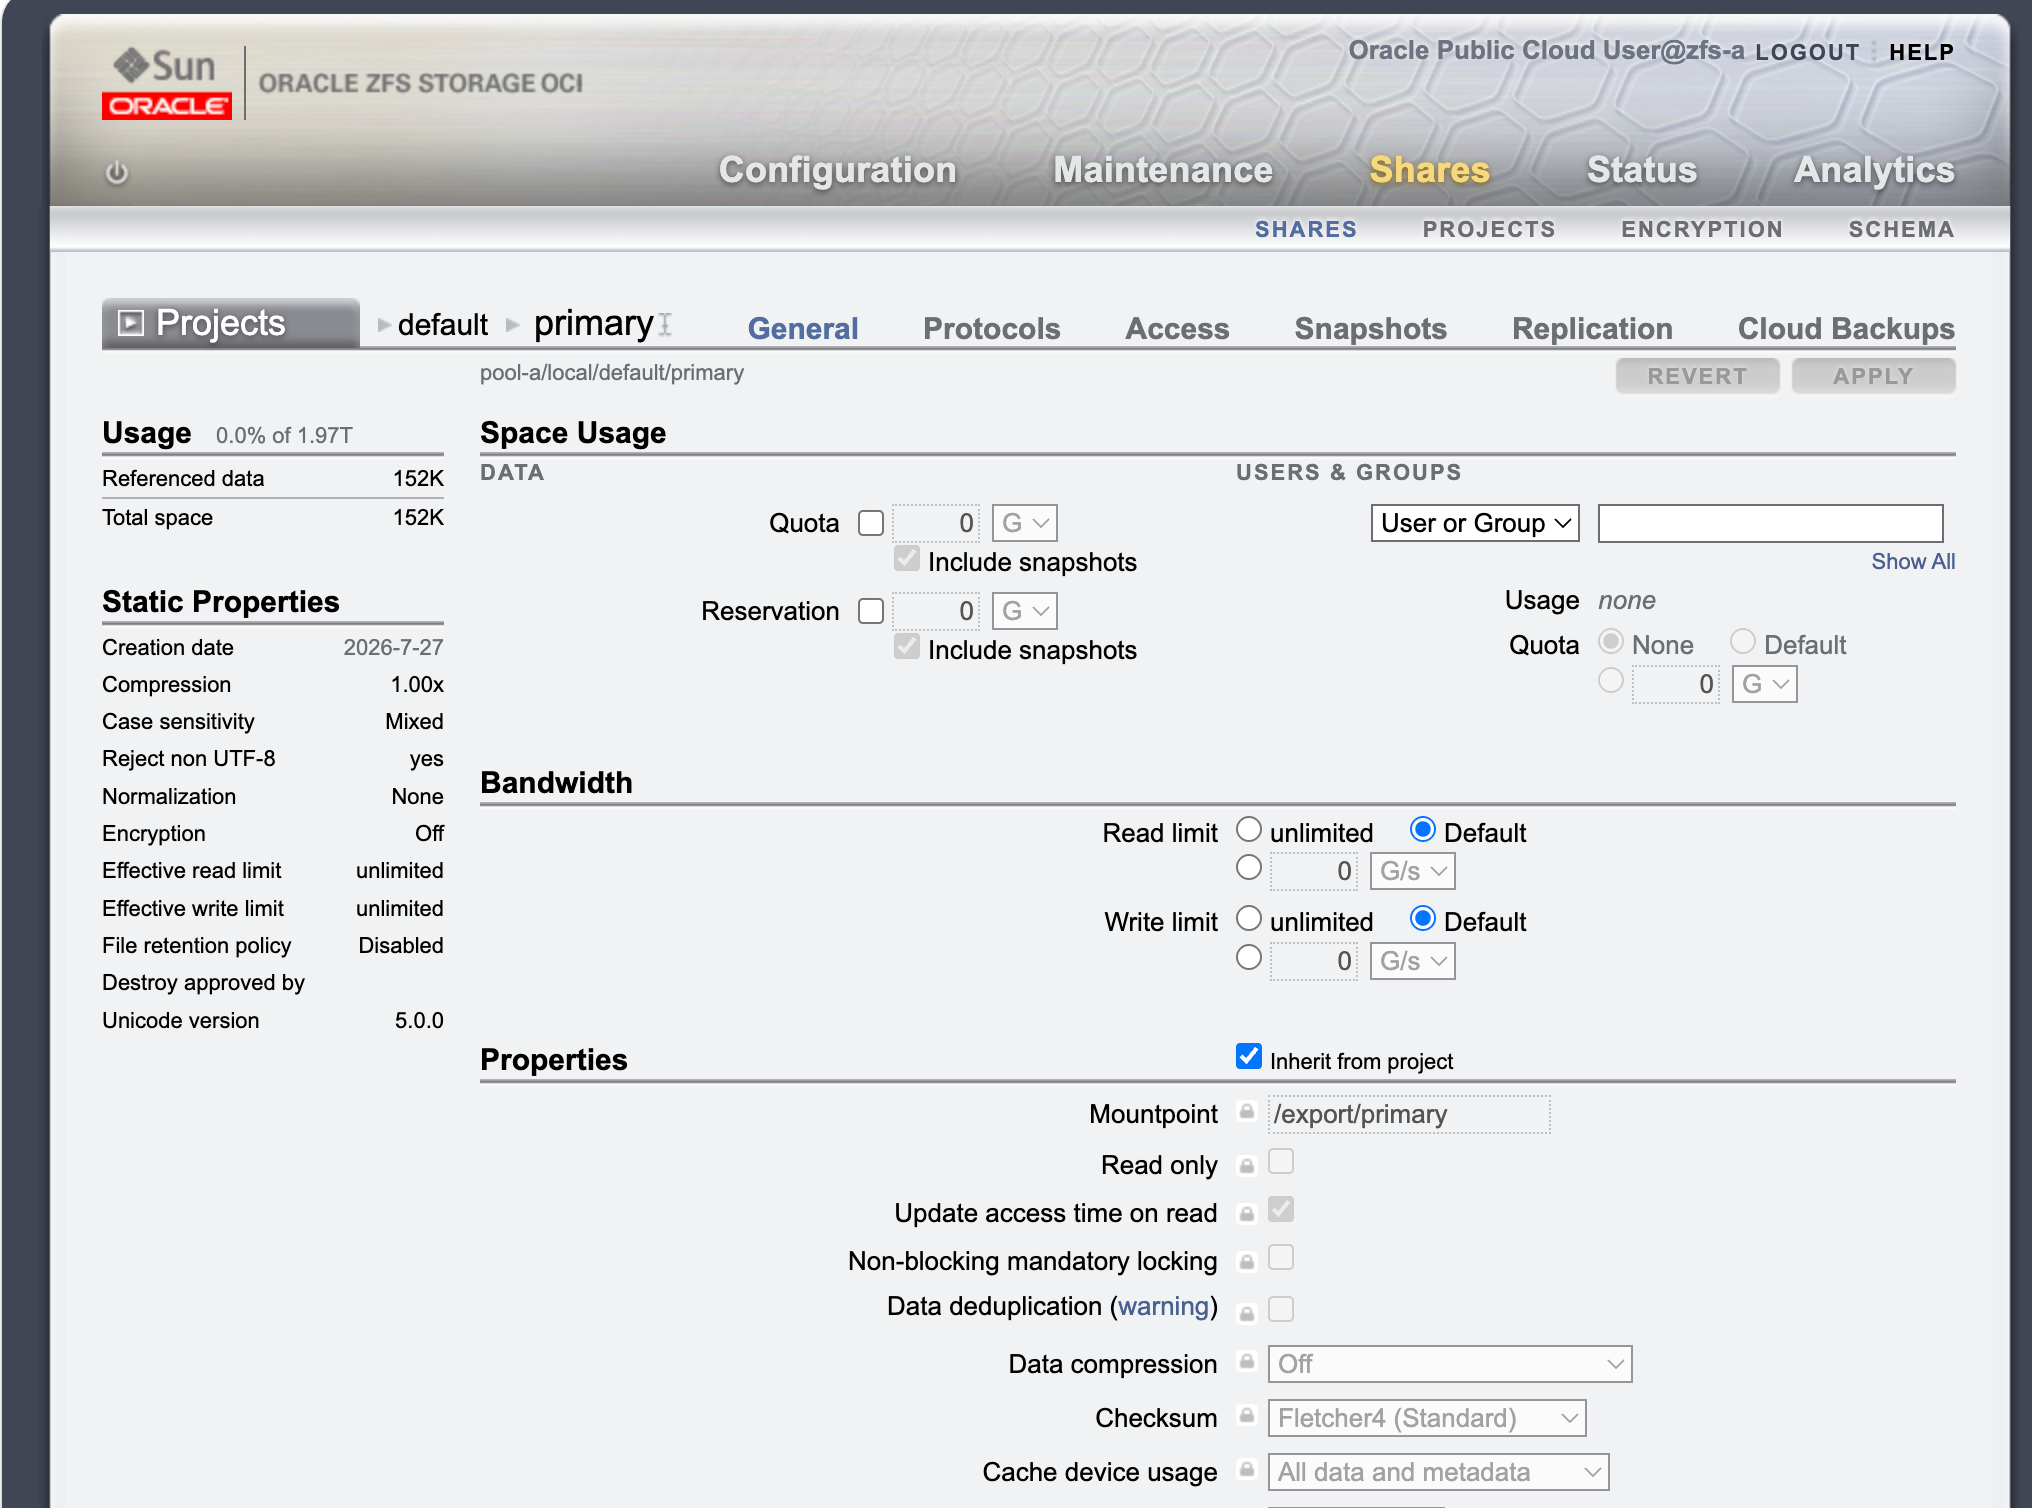
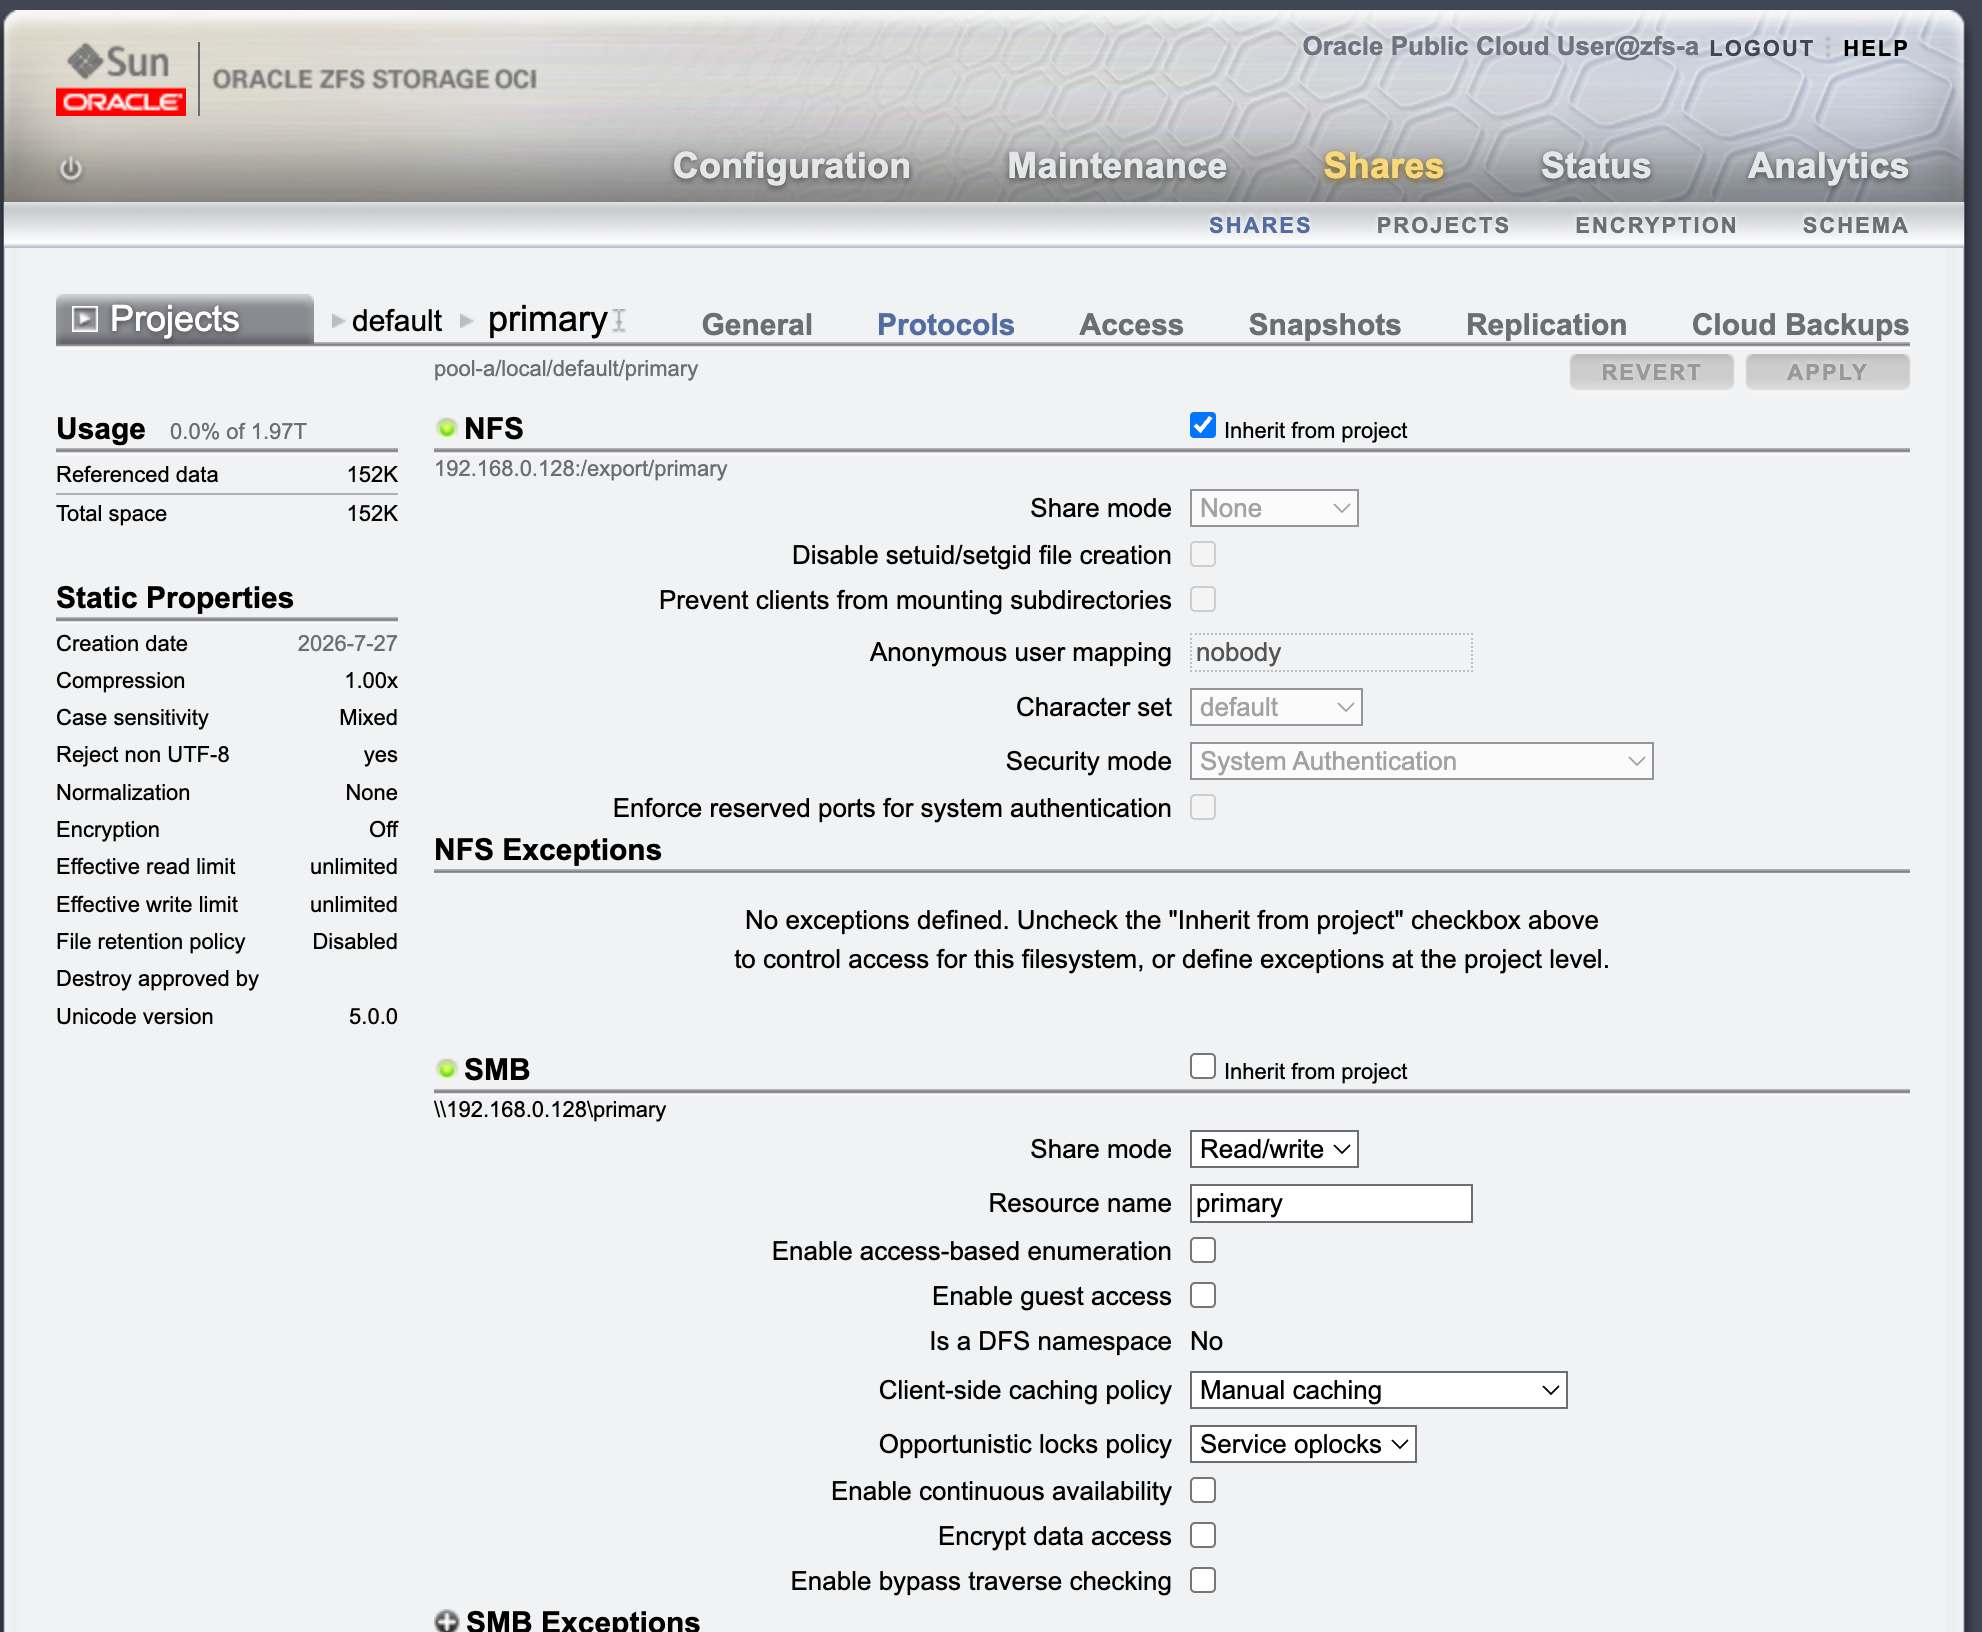
Confirm that the mountpoint is similar to:
/export/primary
The corresponding SMB UNC path is usually:
\\192.168.0.45\primary
2.7 Configure SMB Protocol and Root Access
Go to:
Shares > Projects > <project> > <filesystem> > Protocols
Confirm that SMB is enabled and that the SMB share name matches the UNC path used later, for example primary.
Go to:
Shares > Projects > <project> > <filesystem> > Access
Configure the Root Directory ACL.
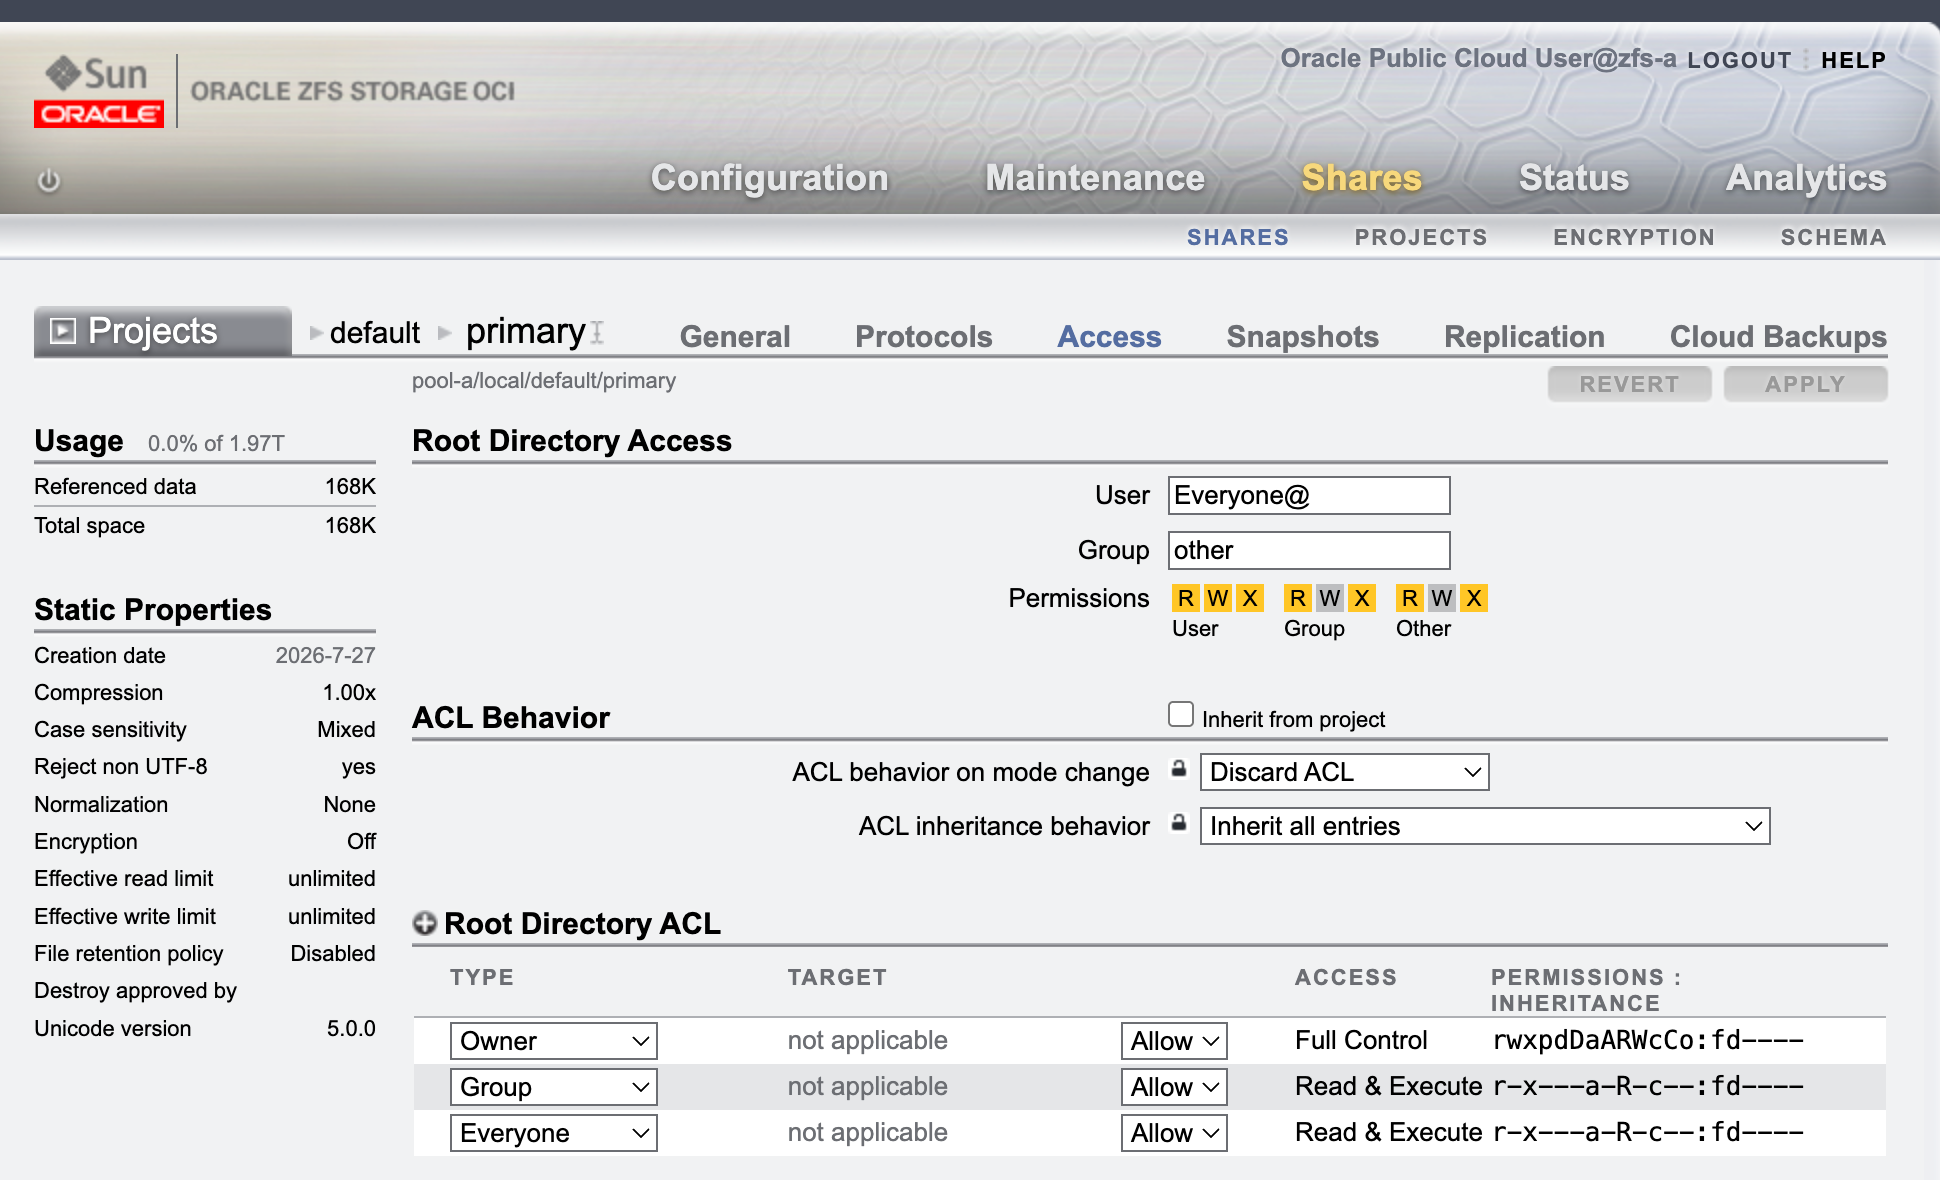
For a PoC, if an AD administrator cannot create profiles under \\192.168.0.45\primary, temporarily grant Full Control to the domain administrator or test user. Do not keep everyone@ Full Control long-term in production.
Recommended examples:
JS\Domain Admins: Full Control
JS\Administrator: Full Control
Root directory permissions only need to allow administrators to create and manage the profiles folder. The actual permissions for FSLogix users are configured in Task 3.
Task 3 — Configure NTFS Permissions for ZFSSA SMB Share
The goal of Task 3 is to create the profiles directory on the ZFSSA SMB share and configure Windows / NTFS-style ACLs.
This step can be performed on the AD server, or on any Windows management machine that has joined the same AD domain and can access the ZFSSA SMB share.
3.1 Open the SMB Share Directly
Do not rely on Windows Explorer Network discovery. Enter the UNC path directly in the address bar or through Win + R:
\\192.168.0.45\primary
If it cannot be opened, test the SMB port first:
Test-NetConnection 192.168.0.45 -Port 445
net view \\192.168.0.45
If the share opens, create the following folder in the share root:
profiles
The final path is:
\\192.168.0.45\primary\profiles
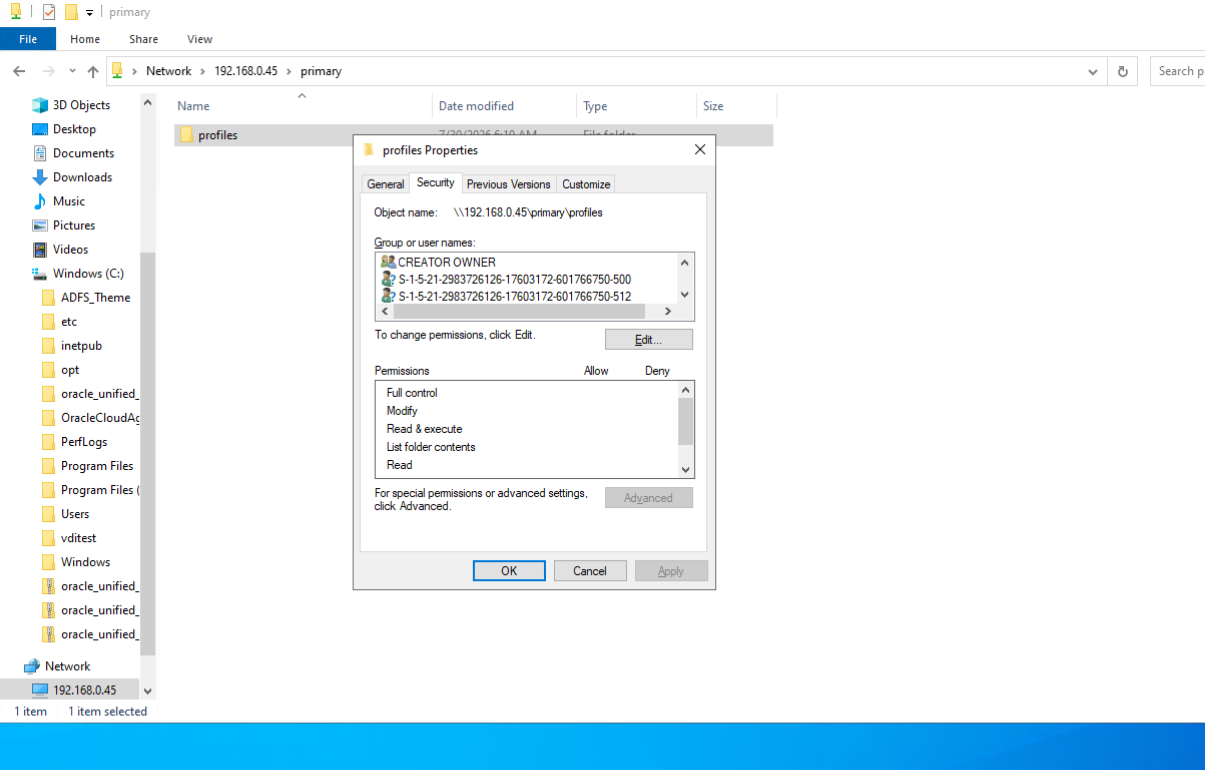
If creating profiles fails with Destination Folder Access Denied, the share root ACL does not allow the current AD user to write. Go back to Task 2.7 and grant Full Control to the domain administrator in the ZFSSA BUI Access page, then open the UNC path again.
3.2 Configure Profiles Folder ACL
Right-click the profiles folder:
Properties > Security > Advanced
Add the following principals:
| Principal | Permission | Applies to | Purpose |
|---|---|---|---|
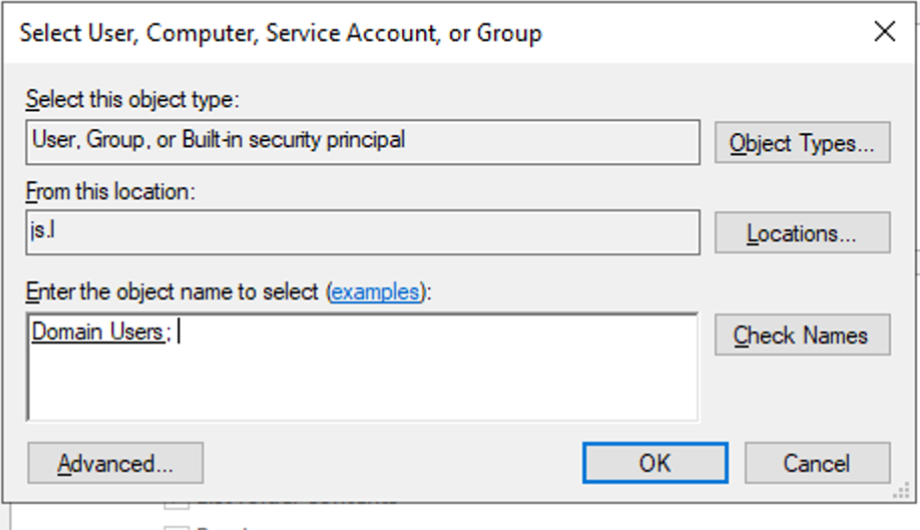
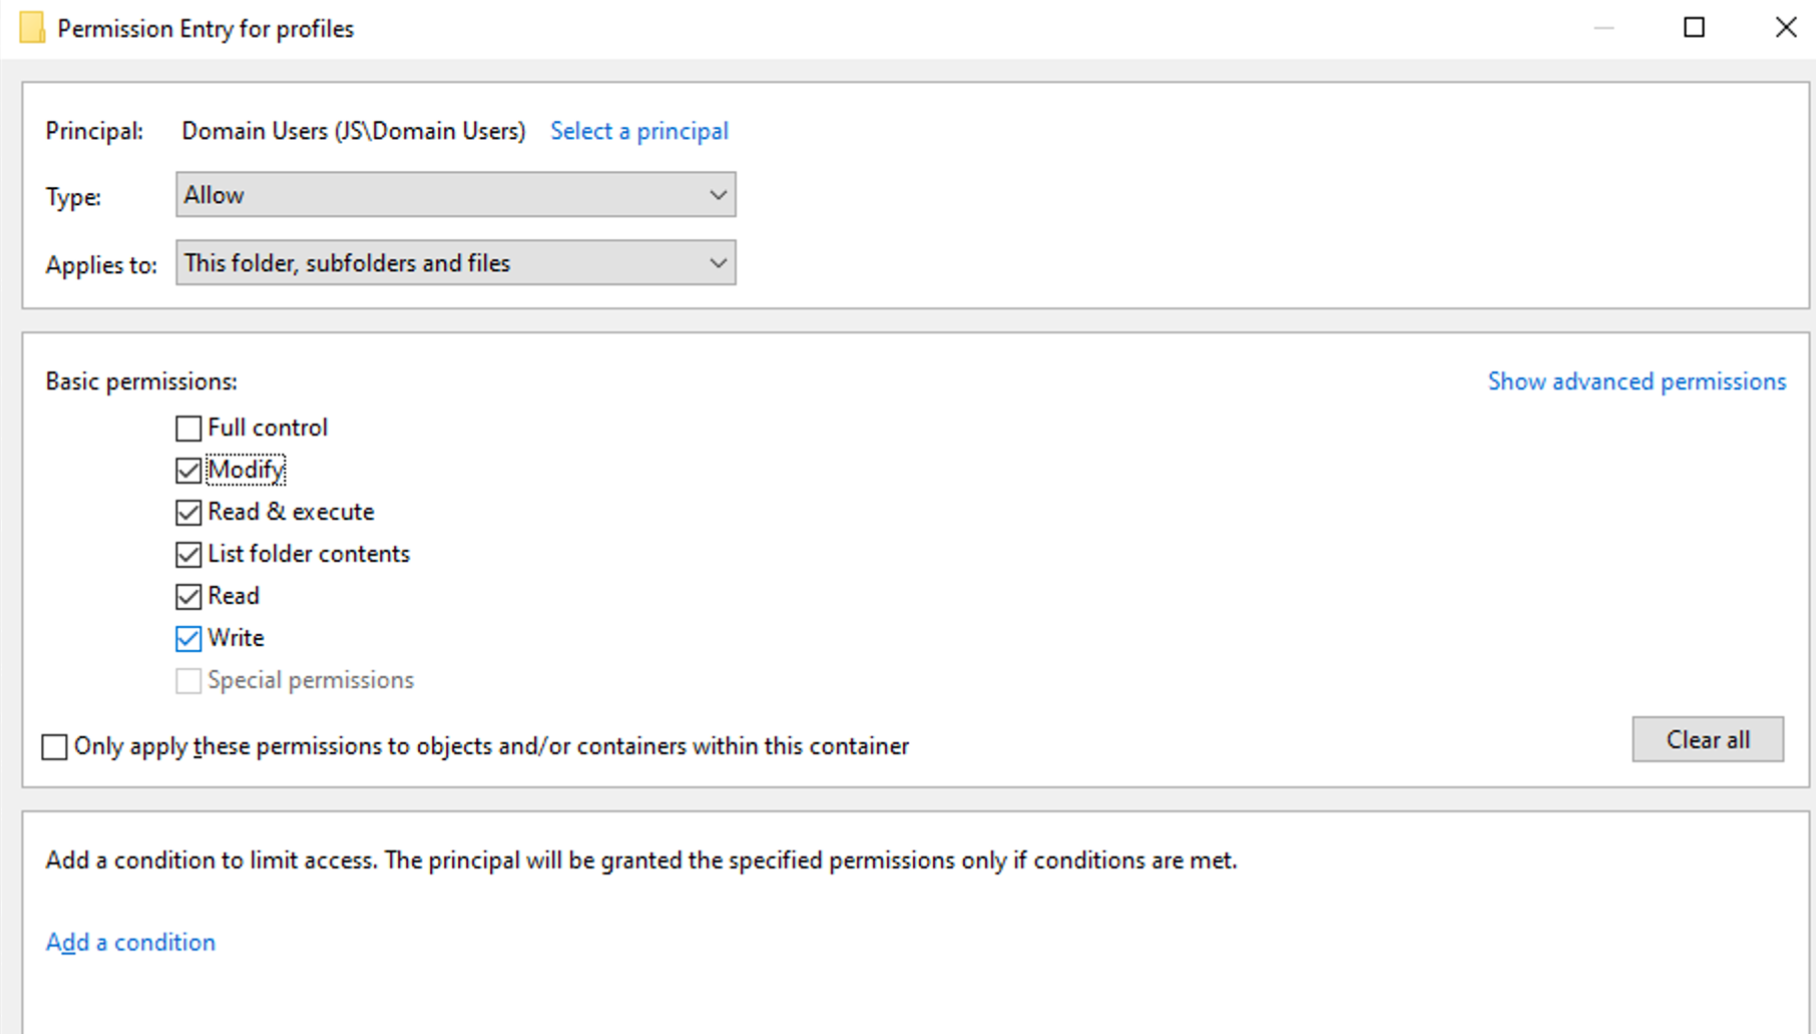
JS\Domain Users | Modify / Create folders | This folder | Allows users to create their own profile container directory |
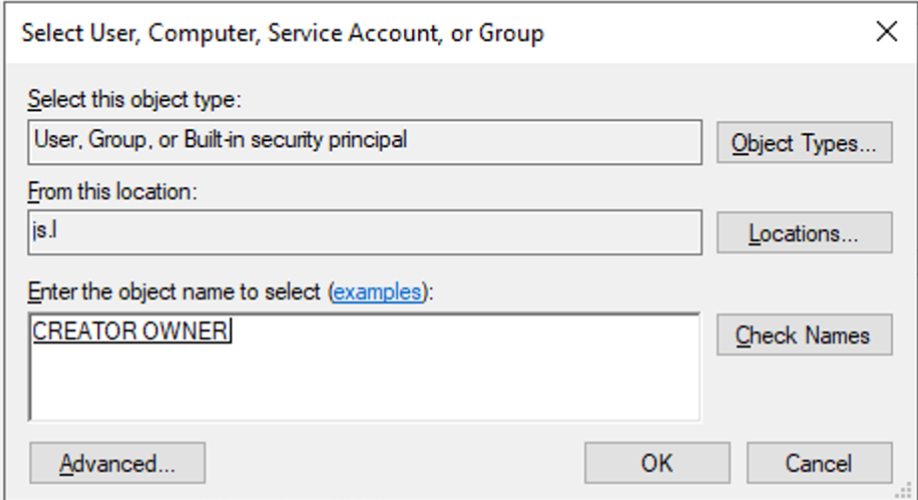
CREATOR OWNER | Modify | Subfolders and files only | Lets users own the directories and VHDX files they create |
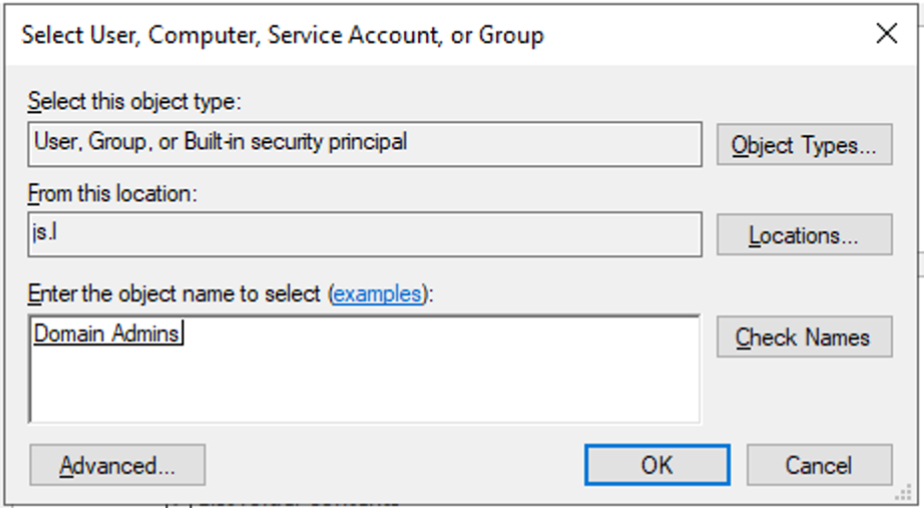
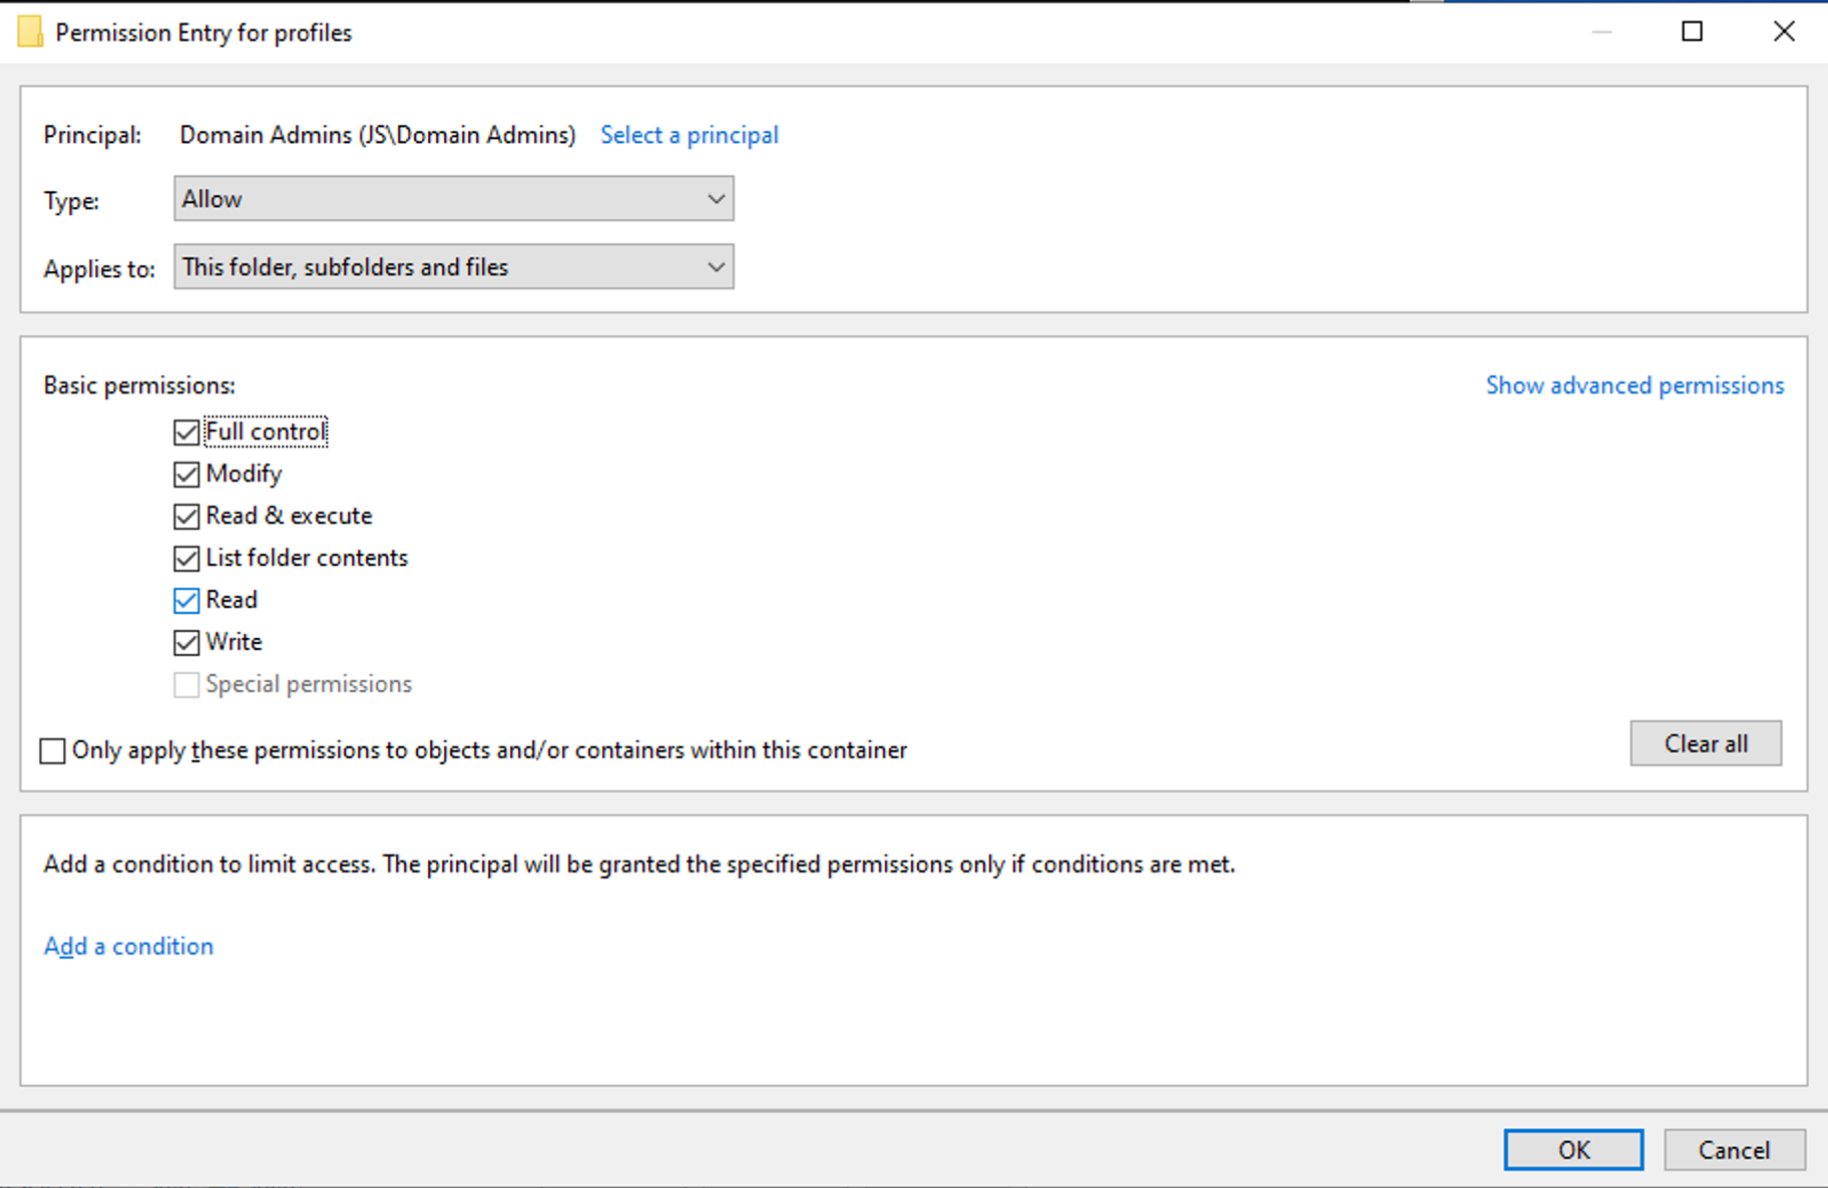
JS\Domain Admins | Full Control | This folder, subfolders and files | Administration and troubleshooting |
Add Domain Users:
Add Domain Admins:
Add CREATOR OWNER:
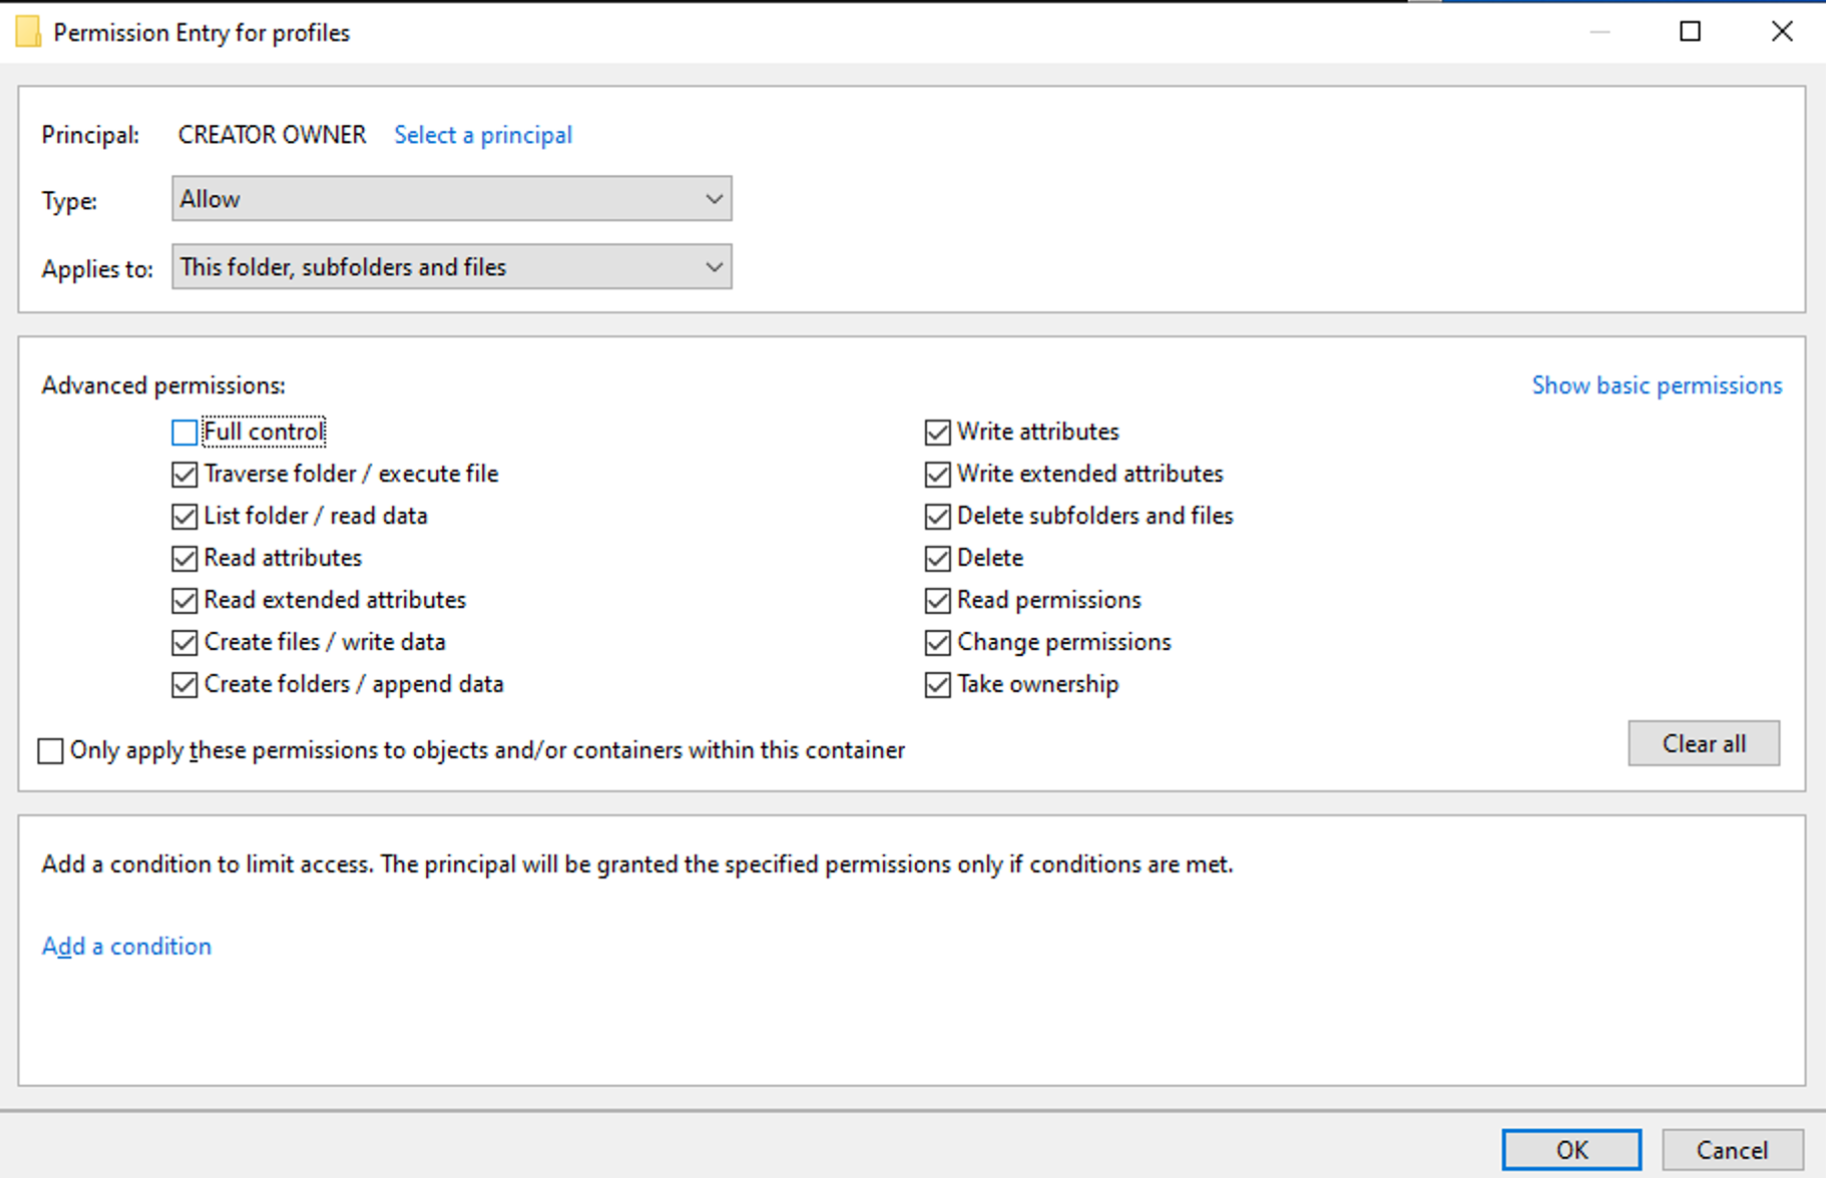
3.3 Disable Inheritance and Remove Unneeded Entries
In Advanced Security Settings:
- Click
Disable inheritance. - Select
Convert inherited permissions into explicit permissions on this object. - Remove unnecessary entries.
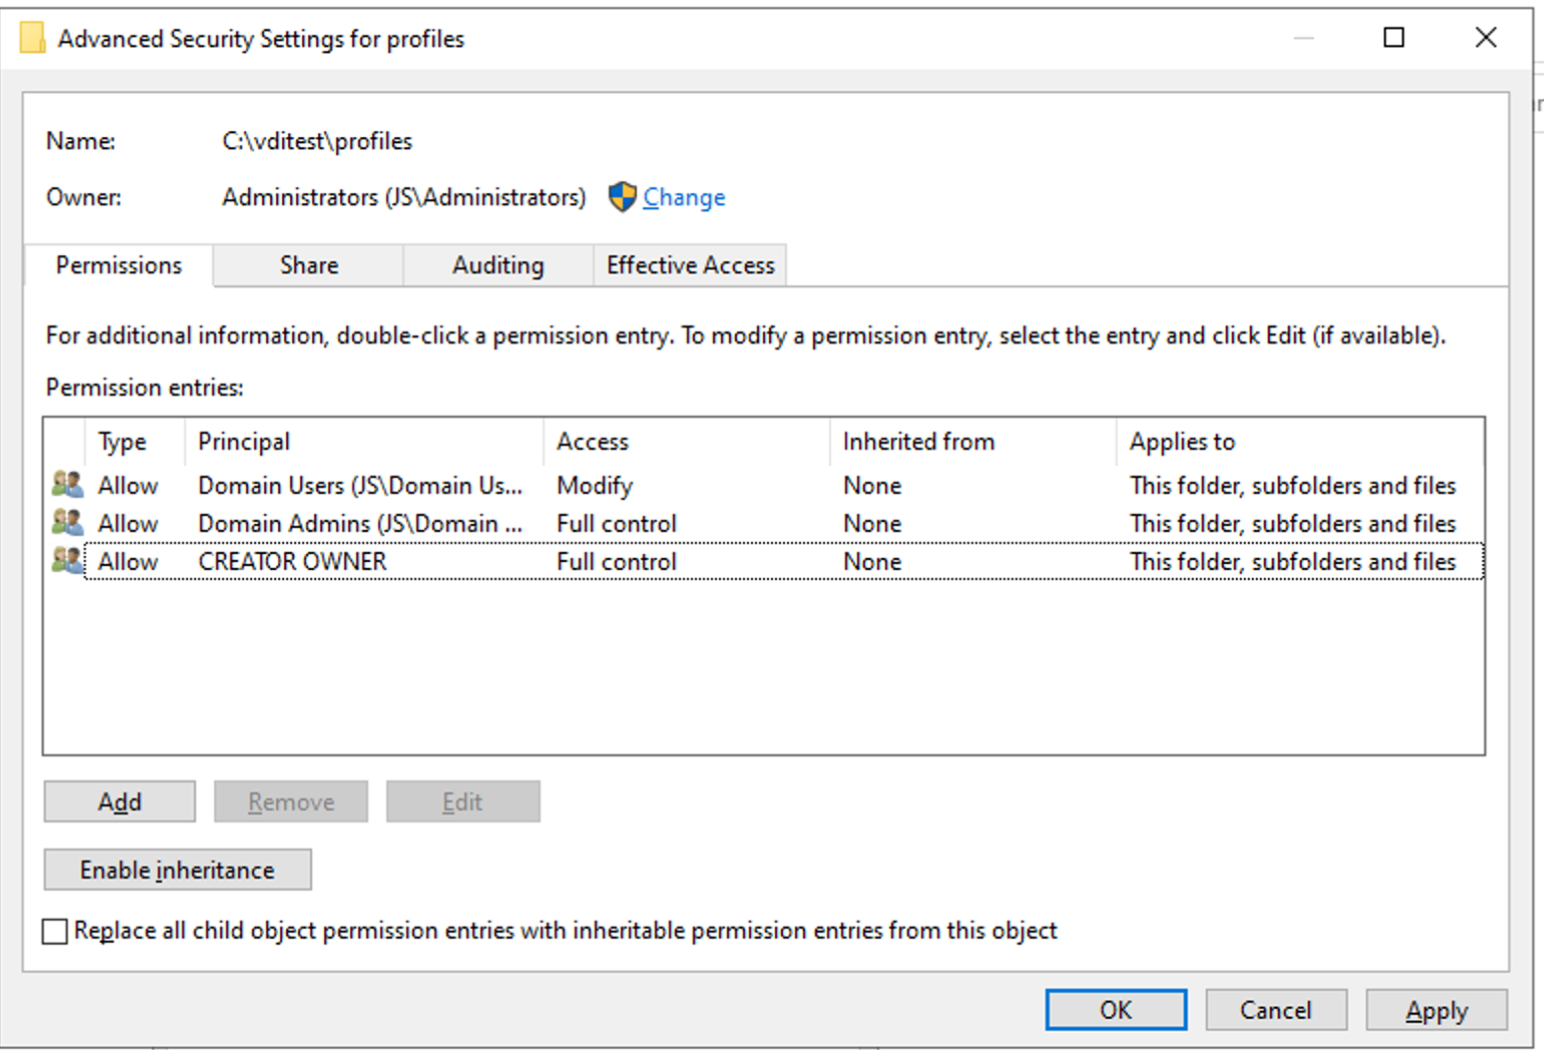
- Keep only the required entries, such as
CREATOR OWNER,Domain Admins, andDomain Users.
The final result should look similar to:
3.4 Optional: Configure with icacls
You can also configure the permissions from an elevated PowerShell session. Replace JS with your actual NetBIOS domain name:
icacls \\192.168.0.45\primary\profiles /inheritance:r
icacls \\192.168.0.45\primary\profiles /grant "CREATOR OWNER:(OI)(CI)(IO)(M)"
icacls \\192.168.0.45\primary\profiles /grant "JS\Domain Admins:(OI)(CI)(F)"
icacls \\192.168.0.45\primary\profiles /grant "JS\Domain Users:(M)"
During PoC troubleshooting, if you still suspect a permission issue, temporarily grant broader permissions to Domain Users:
icacls \\192.168.0.45\primary\profiles /grant "JS\Domain Users:(OI)(CI)(M)"
Tighten the permissions again after validation.
Task 4 — Deploy and Configure FSLogix in Windows 11 Golden Image
Task 4 is performed on the Windows 11 Golden Image / Secure Desktop template VM, not on the AD server.
4.1 Install FSLogix
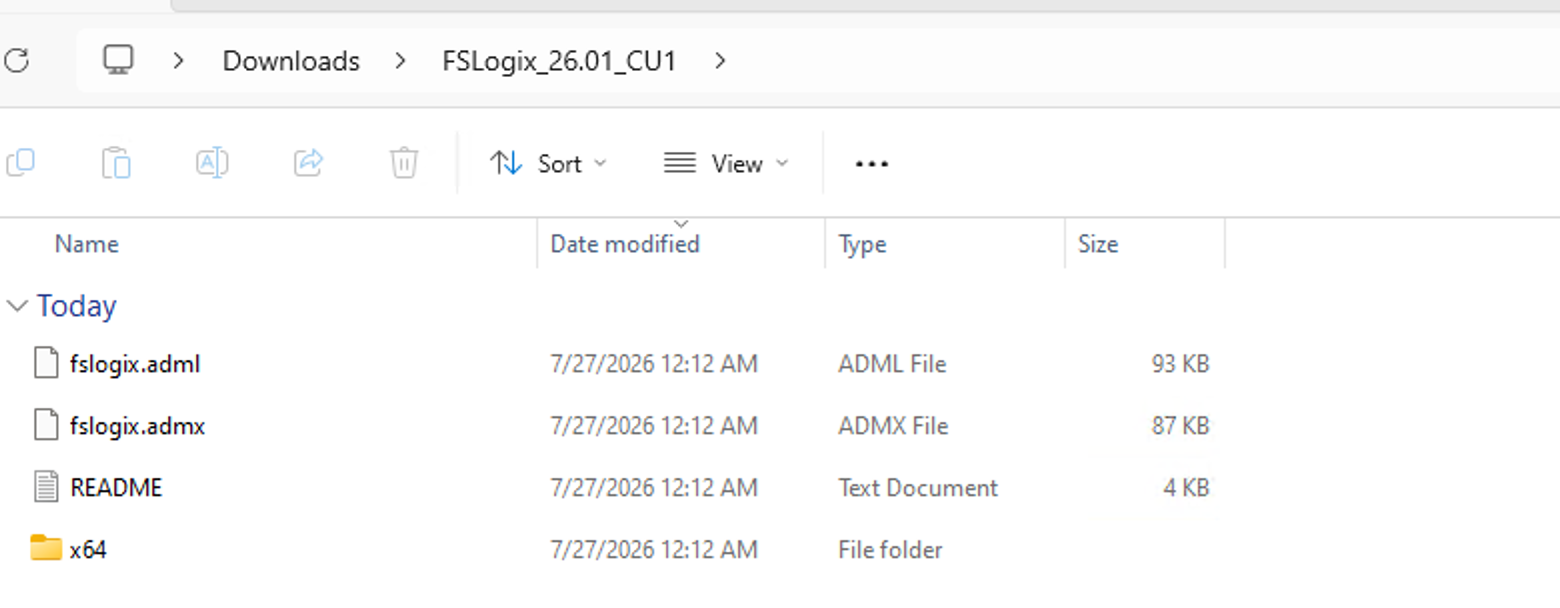
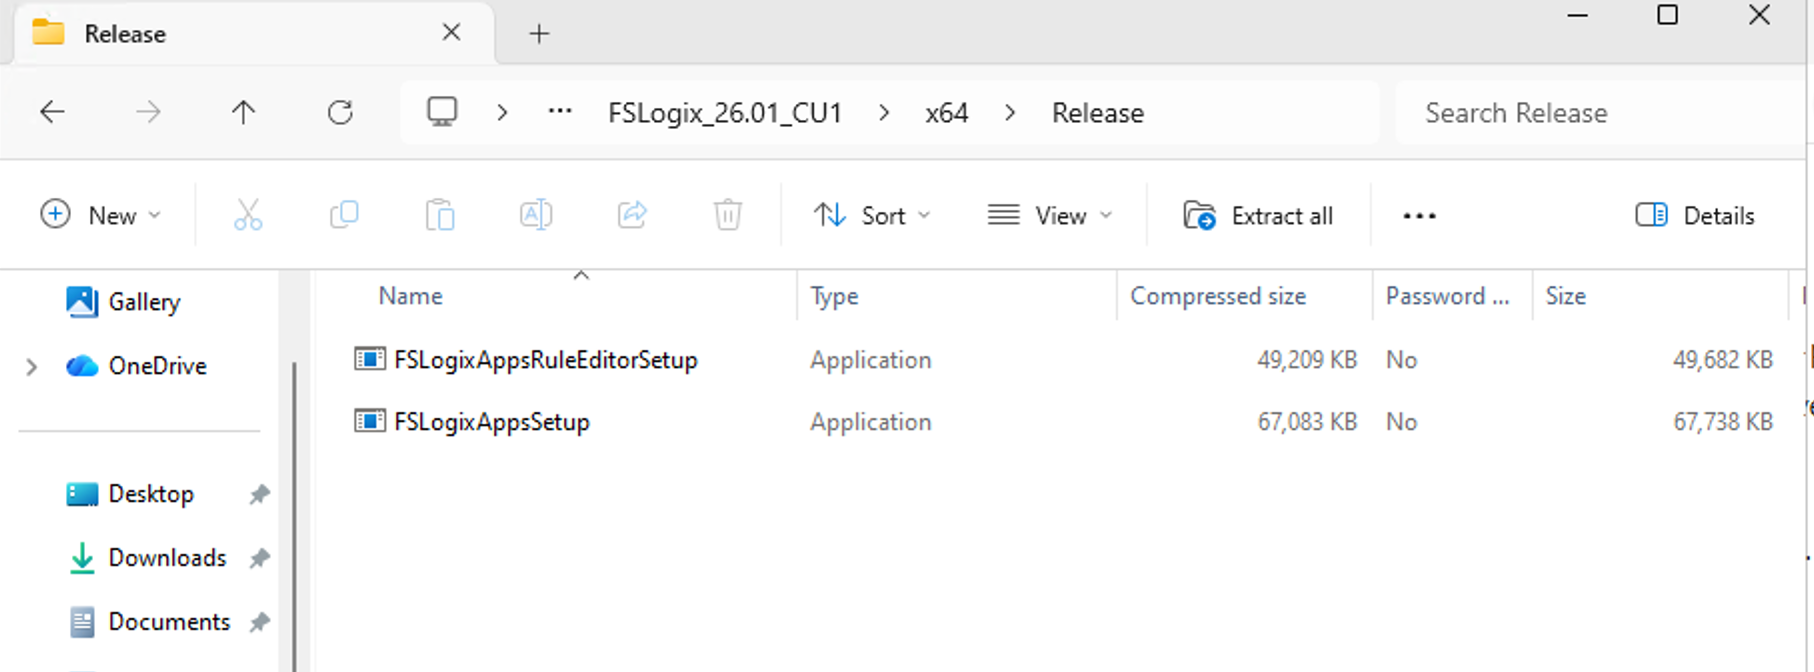
Download the FSLogix installer package, extract it, and go to:
x64\Release
Run:
FSLogixAppsSetup.exe
Reboot after installation.
4.2 Copy ADMX / ADML Policy Templates
Copy the policy template files:
fslogix.admx -> C:\Windows\PolicyDefinitions\fslogix.admx
fslogix.adml -> C:\Windows\PolicyDefinitions\en-US\fslogix.adml
4.3 Configure FSLogix Profiles — Choose One Scenario
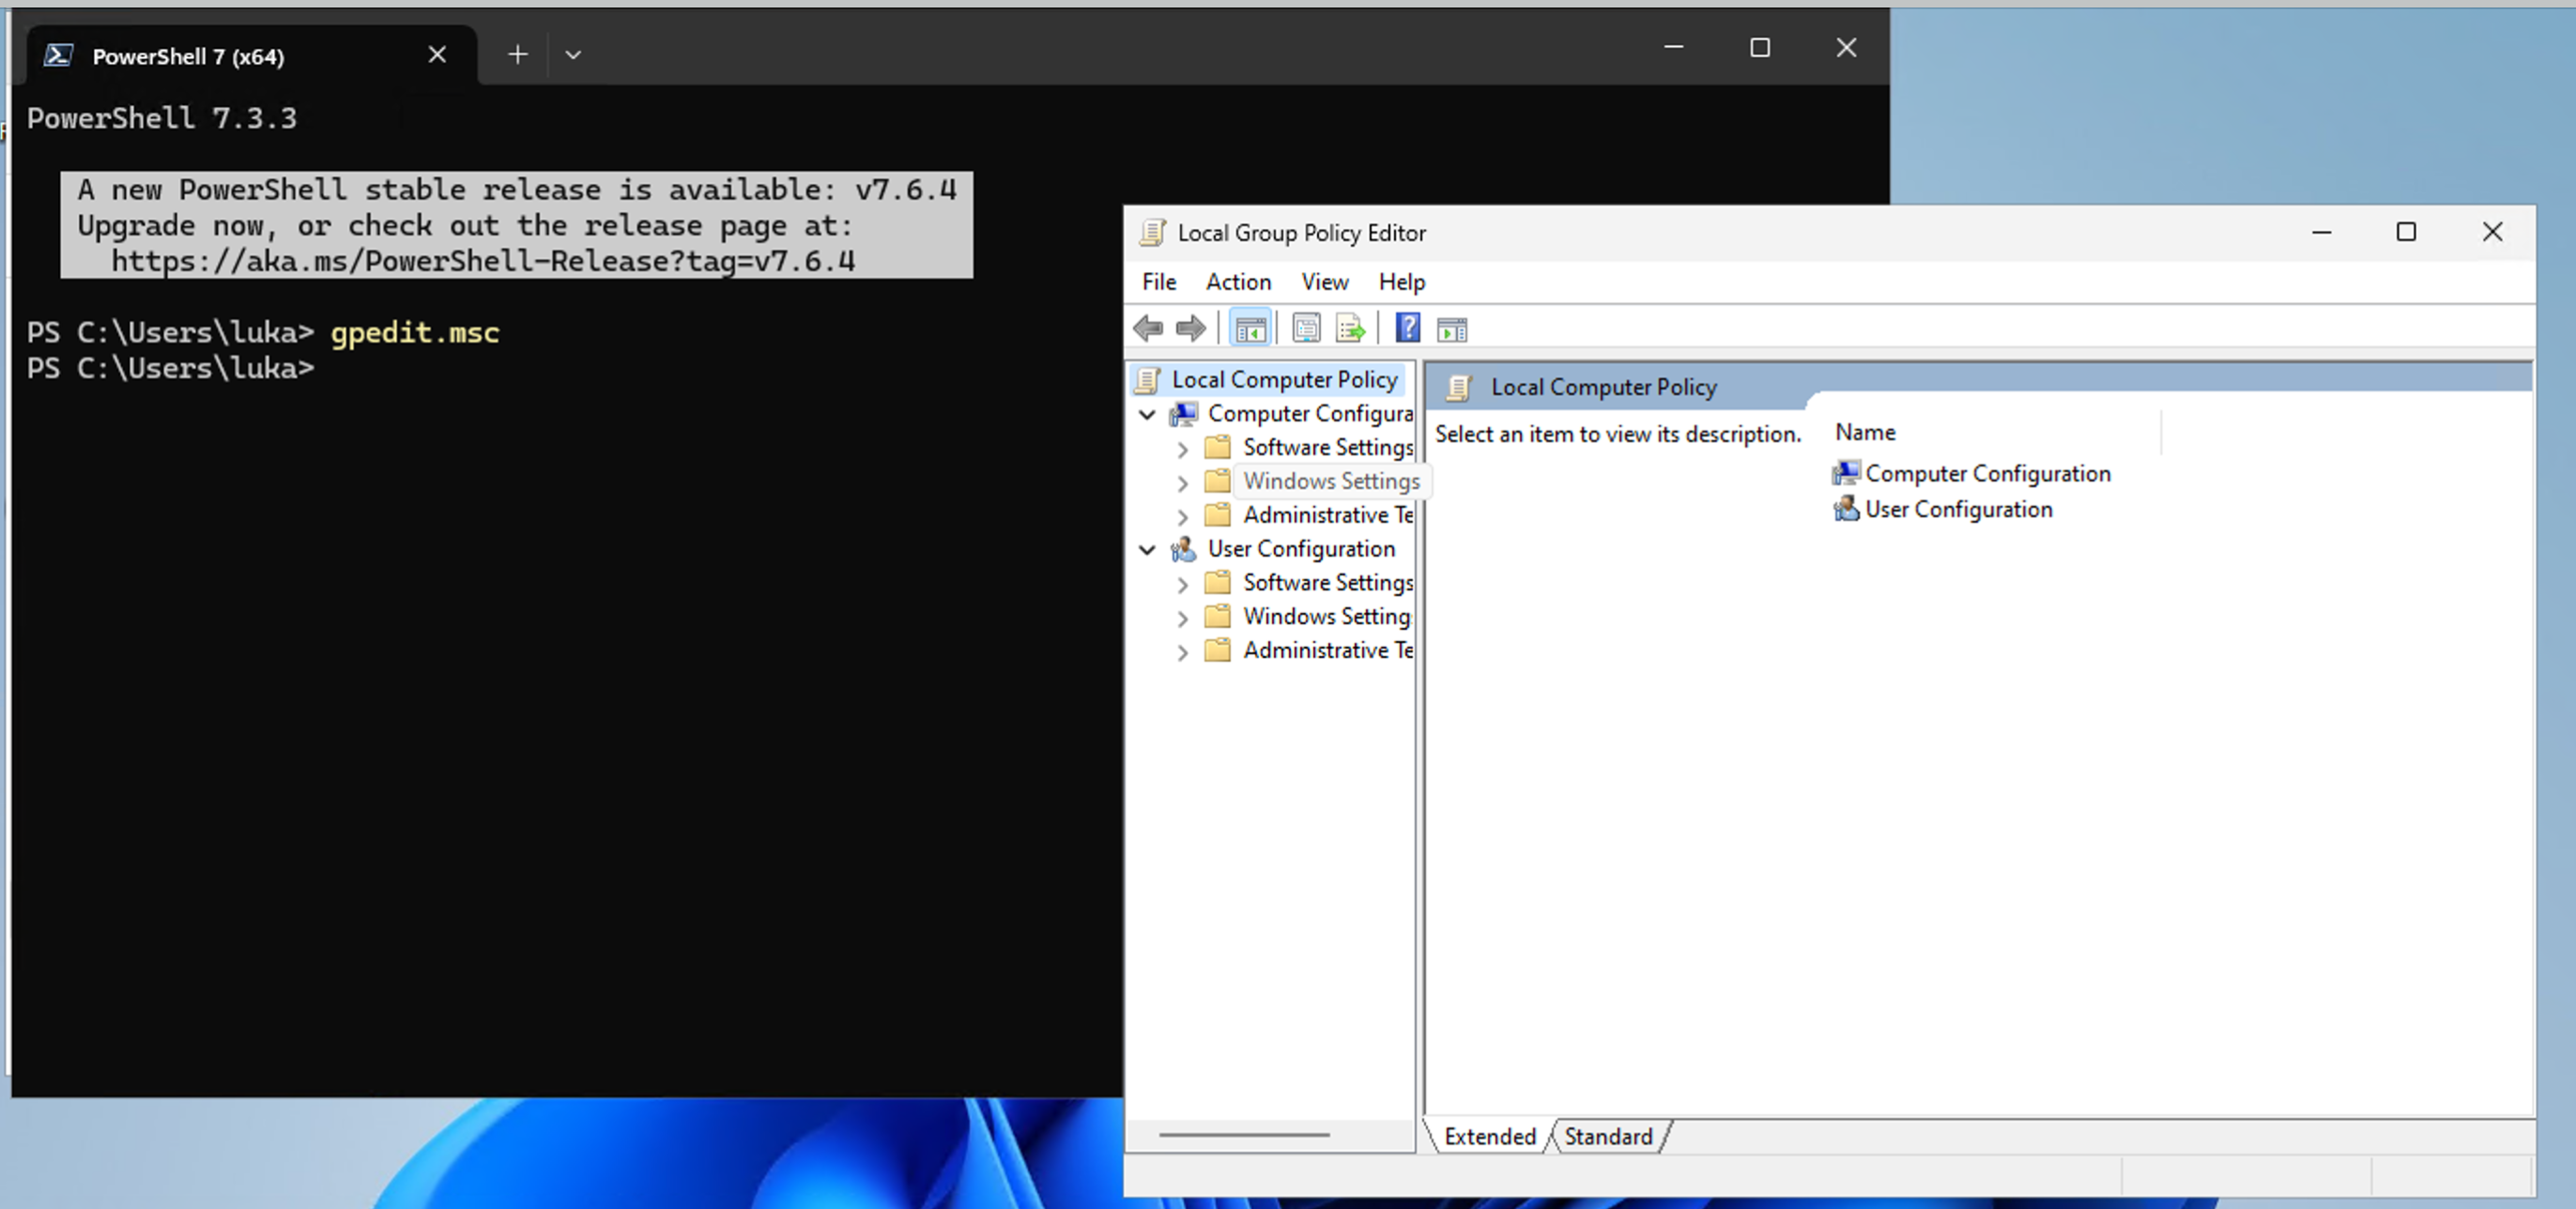
Run:
gpedit.msc
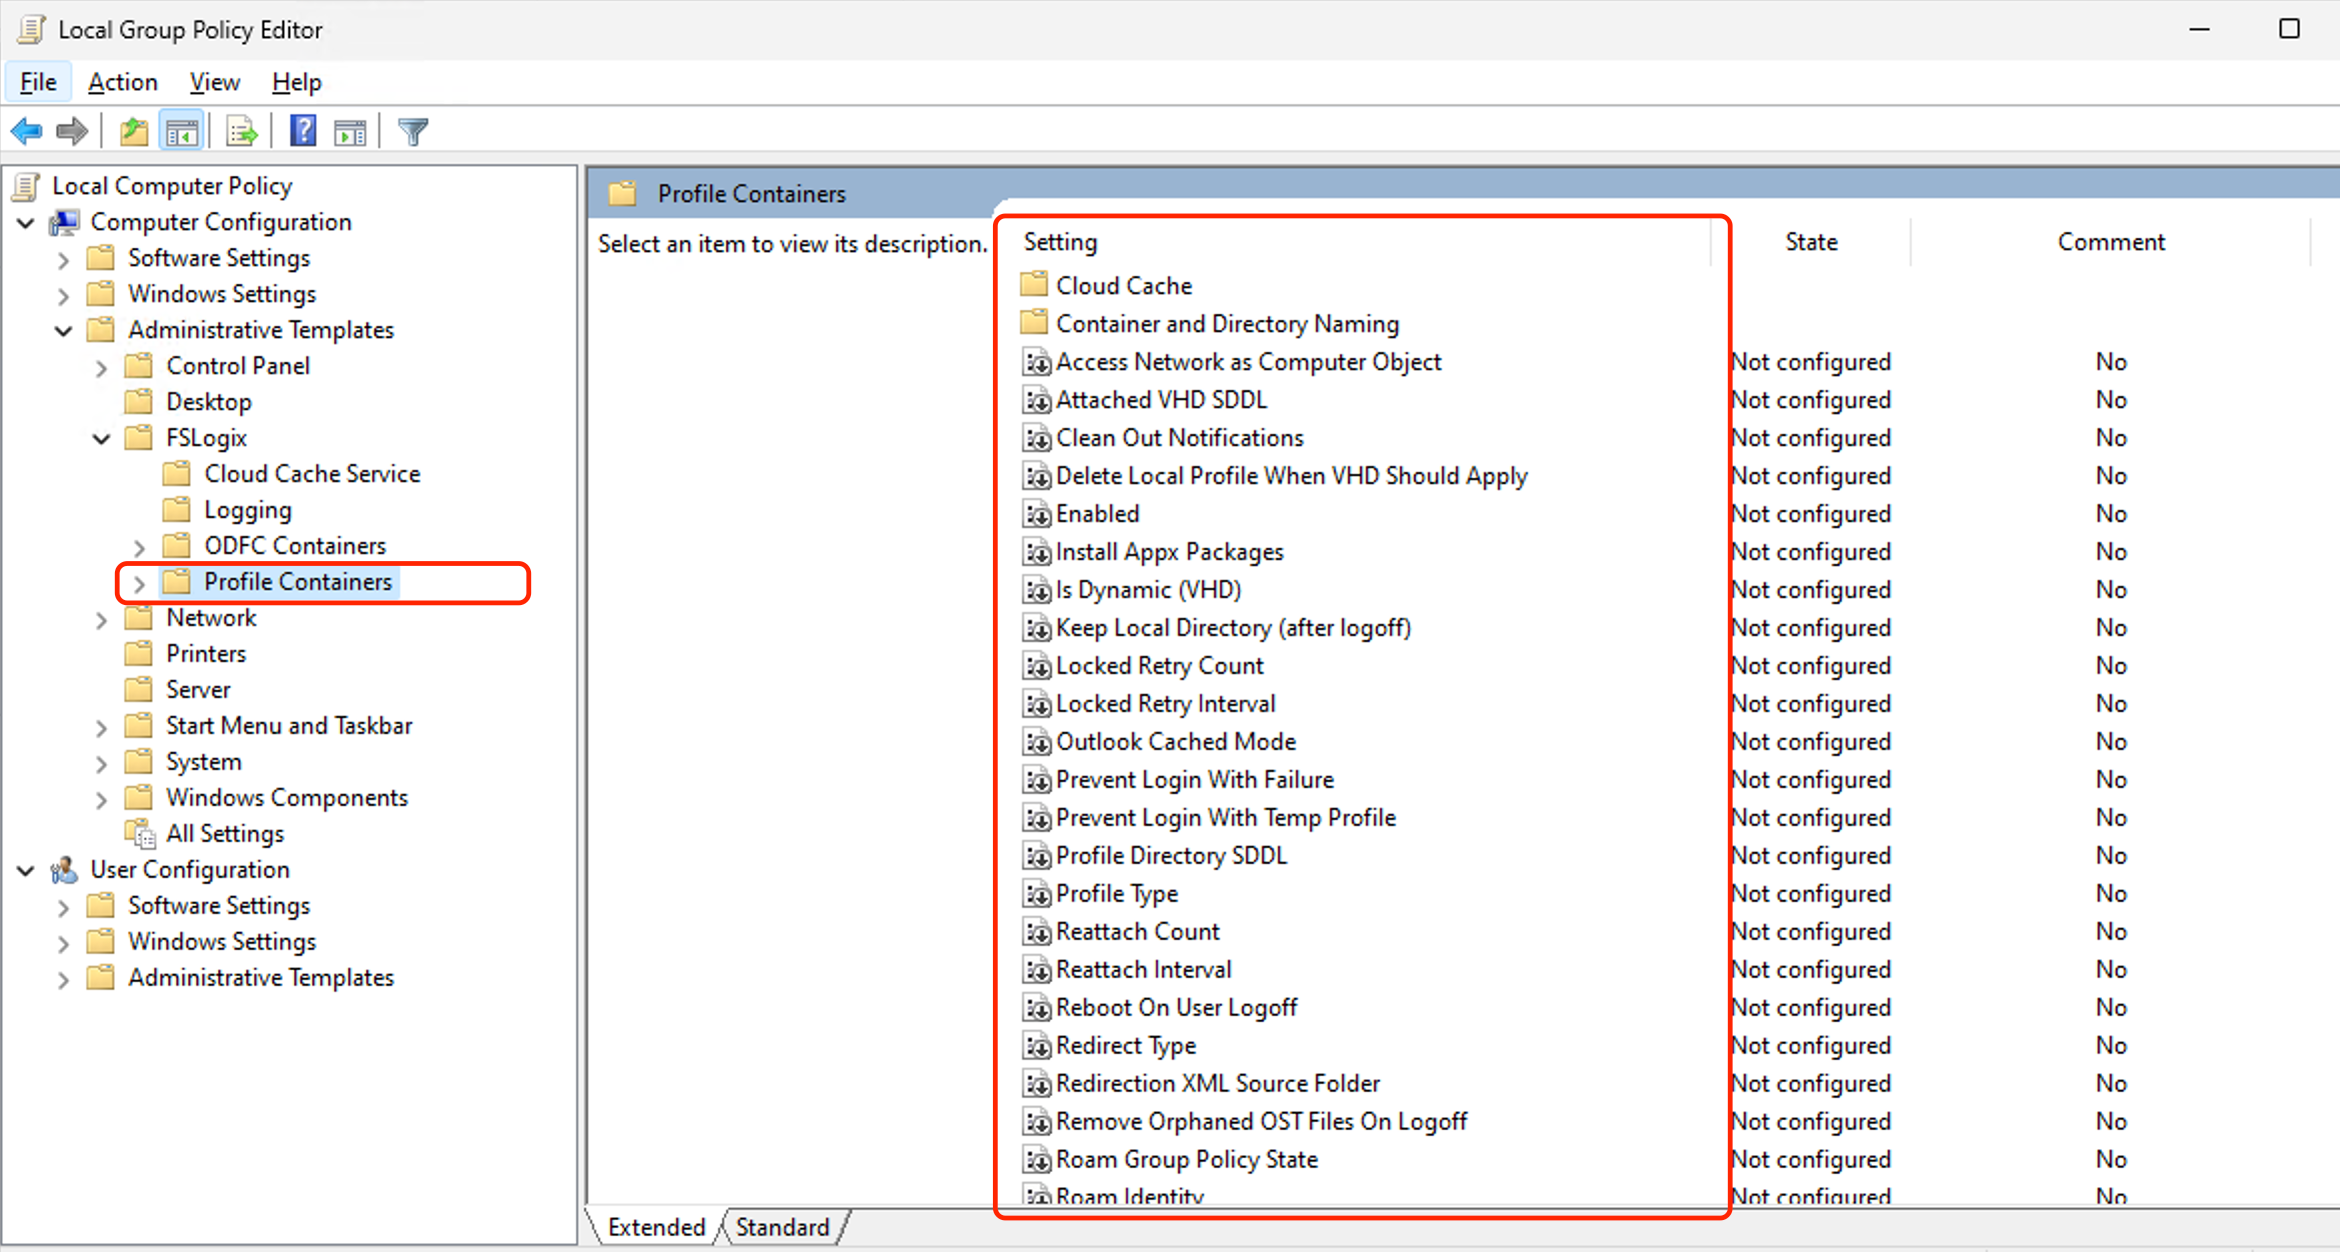
Go to:
Computer Configuration > Administrative Templates > FSLogix > Profile Containers
The following baseline settings are recommended for all scenarios:
| Setting | Value | Description |
|---|---|---|
Enabled | Enabled | Enables FSLogix Profile Container |
Delete Local Profile When VHD Should Apply | Enabled | Avoids conflicts between local profile and FSLogix profile |
Roam Identity | Enabled | Roams identity-related data |
Size in MBs | 30000 | Example size; adjust as required |
Locked Retry Count | 3 or higher | Retry count when the container is locked |
Locked Retry Interval | 15 | Retry interval in seconds |
Reattach Count | 3 or higher | Retry count for reattaching the VHDX |
Reattach Interval | 15 | Reattach interval in seconds |
If
Enabledis not configured, the FSLogix log may showFSLogix Profiles feature is not enabled, and users may log in with a temporary profile.
It is also recommended to enable invalid session cleanup to reduce the chance of profile locks after abnormal shutdowns, direct VM deletion, or interrupted sessions:
reg add "HKLM\SOFTWARE\FSLogix\Apps" /v CleanupInvalidSessions /t REG_DWORD /d 1 /f
This does not replace a normal sign-out and does not guarantee automatic recovery for every abnormal case. It only reduces the chance that a previous session failed to unload the VHDX and blocks the next logon.
Choose one of the following two scenarios. Select the scenario based on your goal, then bake the corresponding configuration into the Golden Image. Do not configure both CCDLocations and VHDLocations on the same Golden Image.
4.4 Scenario 1 — Blog Default: Cloud Cache + Normal Profile
This configuration matches the original Oracle blog approach. Use it when:
- You want to keep the blog-style Cloud Cache
CCDLocationsconfiguration. - You may expand to multiple Cloud Cache providers later.
- The same AD user logs in to only one Windows 11 VM at a time.
- Before switching to another VM, the user can normally
Sign outfrom the previous VM.
Configure the following:
| Setting | Value |
|---|---|
Profile Type | Normal profile |
CCD Locations | type=smb,name="SMB Primary",connectionString=\\192.168.0.45\primary\profiles |
Clear Cache on Logoff | Enabled |
Healthy Providers Required for Register | Enabled, value 1 |
Profile Type = Normal profile means one user uses one primary profile container at a time. If the same user is still logged in to VM1, logging in to VM2 with the same user may fail because the container is locked.
Configure Cloud Cache here:
Computer Configuration > Administrative Templates > FSLogix > Profile Containers > Cloud Cache
Enable CCD Locations and enter the full value as a single line:
type=smb,name="SMB Primary",connectionString=\\192.168.0.45\primary\profiles
Meaning:
type=smb: use the SMB provider.name="SMB Primary": display name of this provider.connectionString=\\192.168.0.45\primary\profiles: the profiles path created and authorized in Task 3.
Do not use the AD IP in CCD Location:
Wrong: \\10.100.0.163\...
Do not use the ZFSSA public management IP:
Not recommended: \\<zfs-adm-public-ip>\primary\profiles
Use the ZFSSA data IP or a stable DNS name:
\\192.168.0.45\primary\profiles
Or:
\\zfs-a.js.l\primary\profiles
If the local group policy does not write the settings successfully, configure them directly from an elevated PowerShell session:
reg add "HKLM\SOFTWARE\FSLogix\Apps" /v CleanupInvalidSessions /t REG_DWORD /d 1 /f
reg add "HKLM\SOFTWARE\FSLogix\Profiles" /v Enabled /t REG_DWORD /d 1 /f
reg add "HKLM\SOFTWARE\FSLogix\Profiles" /v CCDLocations /t REG_SZ /d 'type=smb,name="SMB Primary",connectionString=\\192.168.0.45\primary\profiles' /f
reg add "HKLM\SOFTWARE\FSLogix\Profiles" /v DeleteLocalProfileWhenVHDShouldApply /t REG_DWORD /d 1 /f
reg add "HKLM\SOFTWARE\FSLogix\Profiles" /v SizeInMBs /t REG_DWORD /d 30000 /f
reg add "HKLM\SOFTWARE\FSLogix\Profiles" /v ProfileType /t REG_DWORD /d 0 /f
reg delete "HKLM\SOFTWARE\FSLogix\Profiles" /v VHDLocations /f
reg delete "HKLM\SOFTWARE\FSLogix\Profiles" /v VolumeType /f
gpupdate /force
After rebooting Windows 11, validate:
reg query HKLM\SOFTWARE\FSLogix\Apps /v CleanupInvalidSessions
reg query HKLM\SOFTWARE\FSLogix\Profiles /v Enabled
reg query HKLM\SOFTWARE\FSLogix\Profiles /v CCDLocations
reg query HKLM\SOFTWARE\FSLogix\Profiles /v ProfileType
Expected result:
CleanupInvalidSessions    REG_DWORD    0x1
Enabled                   REG_DWORD    0x1
CCDLocations              REG_SZ       type=smb,name="SMB Primary",connectionString=\\192.168.0.45\primary\profiles
ProfileType               REG_DWORD    0x0
4.5 Scenario 2 — Recommended for Same AD User on Multiple VMs
This is the recommended configuration for the current target:
Goal 1: VM1 should not have a very slow sign-out caused by Cloud Cache flush / compact.
Goal 2: VM2 should be able to log in with the same AD user even if VM1 has not fully exited or is still online.
Use this scenario when:
- There is only one ZFSSA SMB share:
\\192.168.0.45\primary\profiles. - You do not need Cloud Cache multi-provider capability.
- You want to reduce Cloud Cache
.lock/.metastate complexity. - You want VM2 to avoid falling directly into a temporary profile only because VM1 is holding the primary profile container.
This scenario changes from Cloud Cache to a regular Profile Container and enables multi-connection RW/RO fallback:
VHDLocations + ProfileType=3 + VHDCompactDisk=0 + CleanupInvalidSessions=1
Key settings:
| Setting | Value | Purpose |
|---|---|---|
VHDLocations | \\192.168.0.45\primary\profiles | Uses the single ZFSSA SMB path directly instead of a Cloud Cache provider string |
ProfileType | 3 | Tries RW profile first; if RW is already in use, falls back to RO / differencing disk mode |
VHDCompactDisk | 0 | Disables automatic VHD compaction at sign-out to reduce waiting time |
CleanupInvalidSessions | 1 | Cleans invalid FSLogix sessions after abnormal interruption |
CCDLocations | Not configured | Avoids Cloud Cache state and conflicts with VHDLocations |
Elevated PowerShell:
reg add "HKLM\SOFTWARE\FSLogix\Apps" /v CleanupInvalidSessions /t REG_DWORD /d 1 /f
reg add "HKLM\SOFTWARE\FSLogix\Apps" /v VHDCompactDisk /t REG_DWORD /d 0 /f

reg add "HKLM\SOFTWARE\FSLogix\Profiles" /v Enabled /t REG_DWORD /d 1 /f
reg add "HKLM\SOFTWARE\FSLogix\Profiles" /v DeleteLocalProfileWhenVHDShouldApply /t REG_DWORD /d 1 /f
reg add "HKLM\SOFTWARE\FSLogix\Profiles" /v SizeInMBs /t REG_DWORD /d 30000 /f
reg add "HKLM\SOFTWARE\FSLogix\Profiles" /v ProfileType /t REG_DWORD /d 3 /f
reg add "HKLM\SOFTWARE\FSLogix\Profiles" /v VHDLocations /t REG_SZ /d "\\192.168.0.45\primary\profiles" /f
reg add "HKLM\SOFTWARE\FSLogix\Profiles" /v VolumeType /t REG_SZ /d VHDX /f

reg delete "HKLM\SOFTWARE\FSLogix\Profiles" /v CCDLocations /f
If CCD Locations was previously configured through gpedit.msc, set the Cloud Cache CCD Locations policy to Not Configured. Otherwise, values under HKLM\SOFTWARE\Policies\FSLogix\Profiles may override the regular registry configuration.
Check whether policy values still exist:
reg query "HKLM\SOFTWARE\Policies\FSLogix\Profiles" /v CCDLocations
reg query "HKLM\SOFTWARE\Policies\FSLogix\Profiles" /v VHDLocations
reg query "HKLM\SOFTWARE\Policies\FSLogix\Profiles" /v ProfileType
If you confirm that local registry values are used instead of policy, you can temporarily remove old policy values:
reg delete "HKLM\SOFTWARE\Policies\FSLogix\Profiles" /v CCDLocations /f
reg delete "HKLM\SOFTWARE\Policies\FSLogix\Profiles" /v VHDLocations /f
reg delete "HKLM\SOFTWARE\Policies\FSLogix\Profiles" /v ProfileType /f
gpupdate /force
After rebooting Windows 11, validate:
reg query HKLM\SOFTWARE\FSLogix\Apps /v CleanupInvalidSessions
reg query HKLM\SOFTWARE\FSLogix\Apps /v VHDCompactDisk
reg query HKLM\SOFTWARE\FSLogix\Profiles /v Enabled
reg query HKLM\SOFTWARE\FSLogix\Profiles /v VHDLocations
reg query HKLM\SOFTWARE\FSLogix\Profiles /v ProfileType
reg query HKLM\SOFTWARE\FSLogix\Profiles /v CCDLocations
Expected result:
CleanupInvalidSessions    REG_DWORD    0x1
VHDCompactDisk            REG_DWORD    0x0
Enabled                   REG_DWORD    0x1
VHDLocations              REG_SZ       \\192.168.0.45\primary\profiles
ProfileType               REG_DWORD    0x3
CCDLocations              Not present
Test flow:
- Log in to VM1 as
JS\jialu. - Do not wait for a very slow
Sign outon VM1, or keep VM1 logged in. - Log in to VM2 with the same
JS\jialuaccount. - VM2 should enter the desktop and should not fail only because the primary profile container is locked.
Limitations:
- This is an RW/RO fallback multi-connection mode, not an active-active model where two VMs write to the same primary VHDX at the same time.
- Normally only one VM holds the RW profile at a time; the other VM enters with RO / differencing disk behavior.
- Being able to log in to the second VM does not mean all user changes are instantly visible between both VMs.
- User changes across multiple VMs are handled during sign-out and merge phases, and some waiting time may still exist.
- All participating Windows 11 VMs must use the same FSLogix configuration.
- If OneDrive is used, do not use the same profile container from multiple VMs at the same time.
Task 5 — Create Custom Image and Test FSLogix
5.1 Create Golden Image
After installing FSLogix and configuring the policies on the Windows 11 template VM, create an OCI Secure Desktops custom image.
Use this custom image to create a new Secure Desktop Pool.
5.2 Login Test
Log in to the Windows 11 desktop with an AD user.
If login succeeds, the user still sees:
C:\Users\<username>
However, an FSLogix container should be created on the ZFSSA share, for example:
\\192.168.0.45\primary\profiles\<username>_<SID>\Profile_<username>.vhdx
The exact directory naming depends on FSLogix configuration. It may be username_SID or SID_username.
By default, the FSLogix directory on ZFSSA is generated by user and SID, not by VM hostname. Therefore, when the same AD user logs in from different Windows 11 VMs, FSLogix tries to use the same remote profile container.
Sign-out Validation Step (Very Important)
Sign out of the Windows 11 desktop (very important step)
Note: Signing out of Windows 11 is crucial for FSLogix to function correctly, as it ensures that the user profile data is properly saved to the FSLogix profile container located on the ZFSSA.
Use the following sequence during testing:
- Log in to Windows 11 with a test domain user, for example
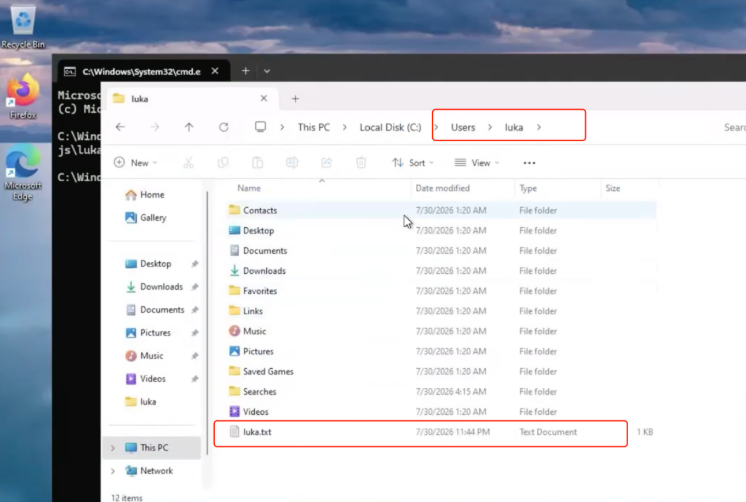
js\lukaorjs\dennis. - Create or modify a test file in the user profile, for example
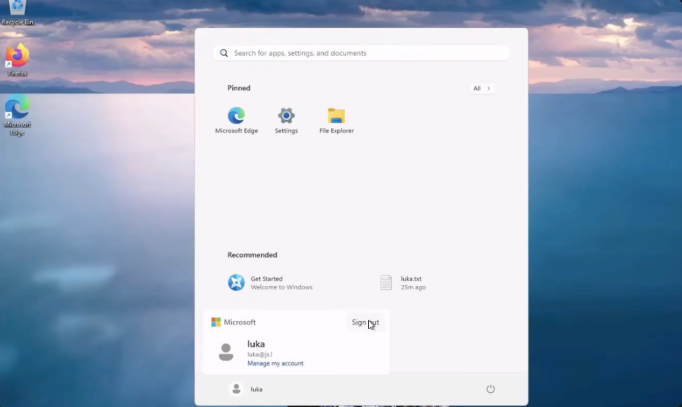
C:\Users\luka\luka.txt. - From the Windows 11 Start menu, select the current user and click
Sign out. Do not only close the RDP / Secure Desktop window.
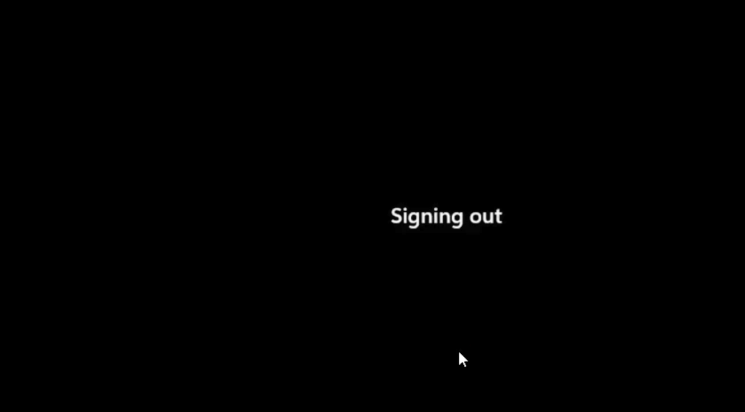
- Wait until Windows shows and completes
Signing out. This step triggers FSLogix to save and unload the user profile container.
- Log in again to the same VM, or log in to another VM created from the same Golden Image, and confirm that the test file still exists under
C:\Users\<username>.
5.3 Verify Persistence
Scenario 1 test flow:
- Log in to Windows 11 as an AD user.
- Create a test file on Desktop or Documents.
- Perform a normal
Sign out; do not directly power off or disconnect. - Log in again, or destroy and recreate the Secure Desktop.
- Confirm that the test file still exists.
If you use Scenario 1 and want to test “delete the first new VM, then create a second new VM”, use this recommended flow:
- Let the test user normally
Sign outfrom the first VM. - Confirm that the user VHDX still exists on ZFSSA.
- Delete the first VM.
- Create the second VM from the same image.
- Log in to the second VM with the same AD user and confirm that the profile data still exists.
If the first VM is deleted directly or shut down abnormally, FSLogix may not have time to unload the VHDX, and .lock, .meta, or other state files may remain on ZFSSA. In that case, logging in to the second VM with the same user may fail.
Scenario 2 test flow:
- Log in to VM1 with the same AD user, for example
JS\jialu. - Create a test file on VM1.
- Do not wait for a very slow
Sign outon VM1, or keep VM1 logged in. - Log in to VM2 with the same
JS\jialuaccount. - Confirm that VM2 can enter the desktop and does not show
We can't sign in to your account. - Check whether RW / RO differencing disk files related to multi-connection mode appear in the ZFSSA profile directory.
5.4 Check Logs
FSLogix log path:
C:\ProgramData\FSLogix\Logs\Profile
View the latest log:
Get-Content "C:\ProgramData\FSLogix\Logs\Profile\Profile_*.log" -Tail 160
Search for:
ERROR
WARN
CCDLocations
VHDLocations
ProfileType
Access is denied
The network path was not found
FSLogix Profiles feature is not enabled
Common Issues and FAQ
Q1. Is it normal that ZFSSA does not appear under Windows Explorer Network?
Yes. Windows Network relies on network discovery / browse services, and a ZFSSA SMB share may not appear automatically.
Access the UNC path directly:
\\192.168.0.45\primary
Or test:
Test-NetConnection 192.168.0.45 -Port 445
net view \\192.168.0.45
Q2. What should I do if creating the profiles folder shows Destination Folder Access Denied?
The ZFSSA share root ACL does not allow the current AD user to write.
Go to the ZFSSA BUI:
Shares > Projects > default > primary > Access
Grant Full Control to the domain administrator or current management account, for example:
JS\Domain Admins: Full Control
Then reopen:
\\192.168.0.45\primary
Create:
profiles
Q3. What exactly should the CCD Location line look like?
This is used only for Scenario 1 / Cloud Cache mode.
Example for this environment:
type=smb,name="SMB Primary",connectionString=\\192.168.0.45\primary\profiles
Mapping:
192.168.0.45 = zfs-data-a IP
primary      = ZFSSA SMB share name
profiles     = directory created in Task 3
If you use Scenario 2, do not configure CCDLocations. Use:
VHDLocations = \\192.168.0.45\primary\profiles
Q4. What should I do if joining AD reports Authentication failed, or the domain controller could not be contacted?
First check AD Security Event 4625.
If the event contains:
IpAddress: <ZFSSA IP>
SubStatus: 0xc0000064
ZFSSA has already contacted the DC, but the user does not exist or the username format is wrong.
Do not use:
opc
js\opc
Use an AD domain account:
Administrator
Or:
JS\Administrator
Q5. What should I do if Windows shows We can't sign in to your account after login?
Windows is using a temporary profile. This usually means FSLogix failed to create or mount the profile container.
First Sign out. Do not continue using the temporary profile.
Then check logs:
C:\ProgramData\FSLogix\Logs\Profile
Common causes:
Enabledis not configured.CCDLocationsis not configured.- SMB path is incorrect.
- The
profilespermissions are insufficient. - A damaged or conflicting local profile already exists.
- The previous VM was deleted directly, leaving remote profile container
.lock/.metastate files.
Q6. What should I do if the FSLogix log shows FSLogix Profiles feature is not enabled?
The global switch is not enabled. Configure:
Computer Configuration > Administrative Templates > FSLogix > Profile Containers > Enabled = Enabled
Or set the registry value:
reg add "HKLM\SOFTWARE\FSLogix\Profiles" /v Enabled /t REG_DWORD /d 1 /f
Reboot and test login again.
Q7. What does Profile Type = Normal profile mean?
Normal profile corresponds to ProfileType=0. It means one user uses one primary profile container at a time.
Suitable for Scenario 1:
VM1 logs in as JS\jialu
VM1 signs out normally
VM2 logs in as JS\jialu
If the target is “VM1 should not wait a long time to sign out, and VM2 should also be able to log in with the same AD user”, do not use Normal profile as the final configuration. Use Scenario 2:
VHDLocations + ProfileType=3 + VHDCompactDisk=0 + CleanupInvalidSessions=1
Q8. How should I configure FSLogix if VM1 should not wait a long time to sign out and VM2 must log in with the same AD user?
Use Scenario 2. The key is to change from Cloud Cache CCDLocations to regular VHDLocations, and enable ProfileType=3 RW/RO fallback multi-connection mode.
This prevents VM2 from failing or entering a temporary profile only because VM1 still holds the primary profile container. It is not an active-active write model where two VMs write to the same primary VHDX at the same time.
Run the following from an elevated PowerShell session on the Golden Image / Source VM:
reg add "HKLM\SOFTWARE\FSLogix\Apps" /v CleanupInvalidSessions /t REG_DWORD /d 1 /f
reg add "HKLM\SOFTWARE\FSLogix\Apps" /v VHDCompactDisk /t REG_DWORD /d 0 /f

reg add "HKLM\SOFTWARE\FSLogix\Profiles" /v Enabled /t REG_DWORD /d 1 /f
reg add "HKLM\SOFTWARE\FSLogix\Profiles" /v DeleteLocalProfileWhenVHDShouldApply /t REG_DWORD /d 1 /f
reg add "HKLM\SOFTWARE\FSLogix\Profiles" /v ProfileType /t REG_DWORD /d 3 /f
reg add "HKLM\SOFTWARE\FSLogix\Profiles" /v VHDLocations /t REG_SZ /d "\\192.168.0.45\primary\profiles" /f
reg add "HKLM\SOFTWARE\FSLogix\Profiles" /v VolumeType /t REG_SZ /d VHDX /f

reg delete "HKLM\SOFTWARE\FSLogix\Profiles" /v CCDLocations /f
If CCD Locations was previously configured through gpedit.msc, set that policy to Not Configured; otherwise, HKLM\SOFTWARE\Policies\FSLogix\Profiles may override the settings above.
Validate:
reg query HKLM\SOFTWARE\FSLogix\Apps /v VHDCompactDisk
reg query HKLM\SOFTWARE\FSLogix\Profiles /v VHDLocations
reg query HKLM\SOFTWARE\FSLogix\Profiles /v ProfileType
reg query HKLM\SOFTWARE\FSLogix\Profiles /v CCDLocations
Expected:
VHDCompactDisk = 0
VHDLocations   = \\192.168.0.45\primary\profiles
ProfileType    = 3
CCDLocations   Not present
If reg query HKLM\SOFTWARE\Policies\FSLogix\Profiles /v CCDLocations still returns a value, local group policy is still overriding the configuration. Set Cloud Cache CCD Locations to Not Configured first.
Q9. How can I avoid manually cleaning .lock files every time?
Prefer Scenario 2 to reduce Cloud Cache state files and sign-out waiting:
VHDLocations + ProfileType=3 + VHDCompactDisk=0 + CleanupInvalidSessions=1
Meaning:
VHDLocations: simpler for a single ZFSSA SMB share.ProfileType=3: if the primary RW profile is already in use, the second session can fall back to RO / differencing disk mode.VHDCompactDisk=0: reduces waiting caused by VHD compaction at sign-out.CleanupInvalidSessions=1: reduces the chance of invalid session leftovers after abnormal interruption.
If a specific previous abnormal VM deletion has already left a damaged or unrecoverable old profile state, manual fallback may still be required. The safer approach is to first confirm that no VM is using that user, then rename the entire user profile directory as a backup so FSLogix can create a new one:
ren "\\192.168.0.45\primary\profiles\Profile_jialu" "Profile_jialu.bak-20260730"
Do not directly delete .vhd files unless you are certain that the user data is no longer needed.
Quick Validation Checklist
Validate in the following order after deployment.
General checks:
- ZFSSA DNS points to
10.100.0.163and can resolve thejs.lSRV records. - ZFSSA has successfully joined AD.
- A Windows management machine can open
\\192.168.0.45\primary. \\192.168.0.45\primary\profileshas been created.- The
profilesACL includesDomain Users,Domain Admins, andCREATOR OWNER. - FSLogix is installed on Windows 11.
HKLM\SOFTWARE\FSLogix\Apps\CleanupInvalidSessions = 1.HKLM\SOFTWARE\FSLogix\Profiles\Enabled = 1.- After AD user login, a user VHDX is generated under the ZFSSA share.
- After sign-out and login again, user files and settings persist.
Scenario 1 — blog default / Cloud Cache:
CCDLocations = type=smb,name="SMB Primary",connectionString=\\192.168.0.45\primary\profiles.ProfileType = 0, or the policy showsNormal profile.VHDLocationsis not present.- Before switching to another VM, the test user should normally
Sign outfrom the previous VM.
Scenario 2 — recommended for the current target / single ZFSSA SMB:
VHDLocations = \\192.168.0.45\primary\profiles.ProfileType = 3.VHDCompactDisk = 0.CCDLocationsis not present;HKLM\SOFTWARE\Policies\FSLogix\Profilesshould not contain an oldCCDLocationspolicy override either.- If VM1 is still online or has not fully signed out, VM2 should be able to log in with the same AD user without entering a temporary profile.
VHDLocations vs CCDLocations
Both VHDLocations and CCDLocations tell FSLogix where to store the profile container, but they are different operating modes. In the current environment there is only one ZFSSA SMB share, so if the goal is “VM1 should not wait a long time to sign out, and VM2 should also be able to log in with the same AD user”, prefer VHDLocations.
VHDLocations
VHDLocations is the regular Profile Container path. When a Windows 11 VM logs in, FSLogix directly accesses the VHDX on ZFSSA over SMB.
Example:
reg add "HKLM\SOFTWARE\FSLogix\Profiles" /v VHDLocations /t REG_SZ /d "\\192.168.0.45\primary\profiles" /f
Access model:
Windows 11 VM -> SMB TCP/445 -> \\192.168.0.45\primary\profiles -> Profile_<username>.vhdx
Suitable for:
- A single ZFSSA SMB share.
- Simpler configuration and fewer state files.
- Reducing sign-out / merge wait introduced by Cloud Cache.
- The current target: VM1 should not wait a long time to sign out, and VM2 should also be able to log in with the same AD user.
Note: to support the same AD user logging in to multiple VMs concurrently or sequentially, use ProfileType=3, so that the second session can fall back to RO / differencing disk mode if the primary RW profile is already in use.
CCDLocations
CCDLocations is the Cloud Cache configuration. The Windows 11 VM uses a Cloud Cache provider string and maintains Cloud Cache-related local cache and remote provider state.
Example:
reg add "HKLM\SOFTWARE\FSLogix\Profiles" /v CCDLocations /t REG_SZ /d 'type=smb,name="SMB Primary",connectionString=\\192.168.0.45\primary\profiles' /f
Access model:
Windows 11 VM -> FSLogix Cloud Cache -> SMB provider -> \\192.168.0.45\primary\profiles
Suitable for:
- Scenarios that require Cloud Cache semantics.
- Future expansion to multiple storage providers.
- Environments that can accept additional waiting during sign-out for Cloud Cache flush / merge.
- The same AD user logs in to only one VM at a time and can normally
Sign outbefore switching VMs.
Note: the value of CCDLocations is not a plain UNC path. It is a provider string. Although the blog example uses only one SMB provider, it still runs in Cloud Cache mode.
Comparison
| Item | VHDLocations | CCDLocations |
|---|---|---|
| FSLogix mode | Regular Profile Container | Cloud Cache |
| Configuration format | UNC path | Provider string |
| Example | \\192.168.0.45\primary\profiles | type=smb,name="SMB Primary",connectionString=\\192.168.0.45\primary\profiles |
| Fit for current environment | Better fit for a single ZFSSA SMB share | Blog default; can be kept but is not preferred for the current target |
| Multiple storage providers | Not suitable | Suitable |
| Local cache / remote state | Simpler | More Cloud Cache state |
| Common extra state files | Fewer | May include .lock, .meta, and similar files |
| Sign-out experience | Usually faster with VHDCompactDisk=0 | May wait for cache flush / merge / compact |
| Recovery after abnormal VM deletion | Simpler, especially with CleanupInvalidSessions=1 | May leave more complex Cloud Cache state |
| Same AD user on multiple VMs | Use with ProfileType=3 | Not recommended as the preferred option for the current target |
| Recommendation | Scenario 2 | Scenario 1 / blog default |
One-line summary:
VHDLocations = directly use the profile VHDX on the ZFSSA SMB share; suitable for a single ZFS share and the current multi-VM login target.
CCDLocations = Cloud Cache; suitable for Cloud Cache / multi-provider scenarios, but sign-out and abnormal recovery are more complex.
Do not configure both at the same time. If Cloud Cache CCD Locations was previously configured through gpedit.msc, set it to Not Configured before switching to VHDLocations, and confirm that HKLM\SOFTWARE\Policies\FSLogix\Profiles does not contain an old CCDLocations override.